


A weekend spent building a door canopy has a way of paying off for decades, provided the materials and mounting get the right attention from day one.
Wood, metal, and polycarbonate each suit different budgets and weather conditions, though pressure-treated lumber paired with galvanized hardware tends to hold up best against rot over time.
Local building codes matter more than most people realize. They shape everything from the design chosen to how the structure gets mounted, and skipping that step often leads to headaches later.
Small choices add up fast in a project like this. The right materials and proper mounting separate canopies that last decades from those that sag or leak within just a few seasons.
A Few Things Worth Knowing First
Material choice should reflect the local climate before anything else. Regions with heavy snow or rain call for a steeper pitch and stronger framing, regardless of which material ends up on the roof.
Building codes are worth checking before any lumber gets cut. Skipping that step is one of the most common reasons DIY projects stall out partway through.
Proper mounting deserves as much attention as the build itself. A beautifully constructed canopy that isn’t anchored correctly will fail long before the materials themselves wear out.
What Type of Door Canopy Should You Build?
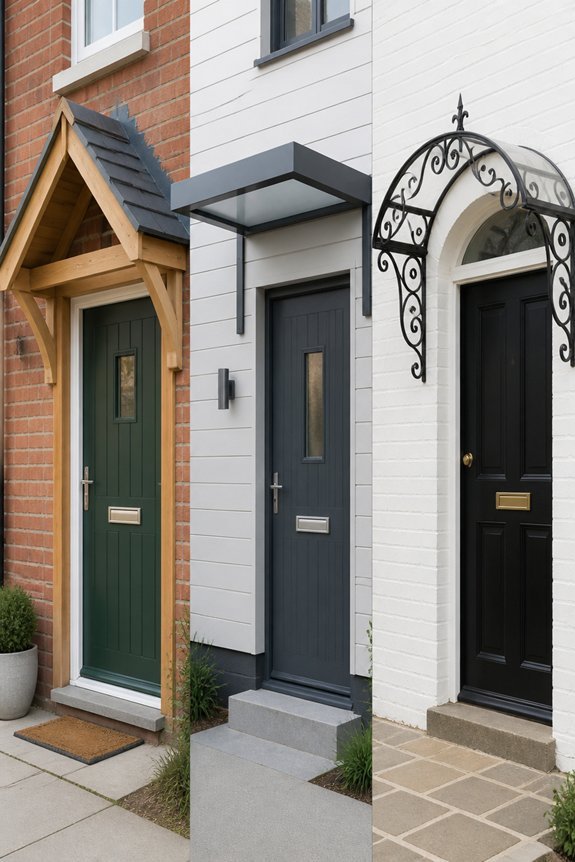
Before choosing a design, a homeowner should consider the style of the existing structure, the available budget, and the intended purpose of the canopy. A modern home may suit a flat or shed-style canopy, while a traditional home often pairs well with a gabled or pitched design.
Common materials include wood, metal, polycarbonate, and fabric. Wood offers a classic appearance, while metal and polycarbonate provide durability with less maintenance. Fabric canopies, such as retractable awnings, work for temporary or seasonal use. A homeowner should also consider local weather conditions, since heavy snow or rain may require a steeper pitch and stronger framing.
Matching the canopy style to the home’s existing trim, roofline, and color scheme produces the most cohesive result.
Also read: How to Set Up a Canopy for an Outdoor Wedding
Gather Your Tools and Materials for the Build
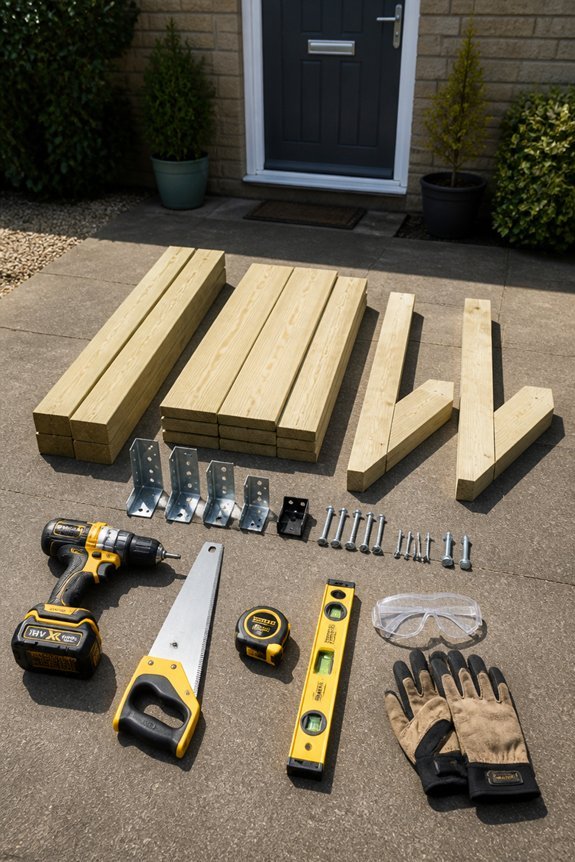
Gathering the right tools and materials early saves time and prevents delays once the build begins. Most canopy projects require a circular saw, drill, level, tape measure, and a miter saw for cutting angles. Fasteners should include galvanized screws, joist hangers, and exterior-grade bolts rated for outdoor use.
For materials, pressure-treated lumber works well for the frame, while cedar or pine suits the decorative fascia boards. The roofing layer may use polycarbonate sheets, cedar shingles, or corrugated metal panels, depending on the chosen canopy style. Exterior wood primer and paint or sealant protect the finished structure against moisture and UV exposure. Having all items on-site before starting prevents unnecessary work stoppages and keeps the project moving at a steady pace.
Measure and Plan Your Door Canopy Design

Careful measurement and planning shape the success of any door canopy project. Builders should measure the door width, wall space, and overhead clearance before selecting a design.
A standard canopy typically extends 24 to 36 inches outward from the wall, providing adequate shelter from rain and sun. The width should match or slightly exceed the door frame, often ranging from 40 to 60 inches. Builders should sketch a simple diagram, noting the pitch angle, bracket placement, and roofing material dimensions.
A slope between 15 and 30 degrees allows proper water runoff. Wall material, such as brick, wood siding, or concrete, affects anchor point selection. Recording all measurements on paper reduces errors during the build and helps when purchasing lumber, hardware, and roofing panels.
Cut and Assemble Your Door Canopy Frame
With measurements recorded and materials purchased, cutting and assembling the frame becomes the next phase of the project. Workers should use a miter saw to cut lumber, such as 2×4 or 2×6 boards, to their planned dimensions. Each cut should match the recorded measurements precisely, as small errors can affect the overall fit against the house.
Once cut, the frame pieces are assembled using galvanized screws, metal brackets, or joist hangers. A basic canopy frame includes a ledger board, two side arms, and a front beam. The ledger board attaches directly to the exterior wall, while the side arms connect it to the front beam. Checking for square corners using a carpenter’s square keeps the structure properly aligned before any permanent fasteners are driven in.
Attach the Roof and Weatherproof It the Right Way
Once the frame is secure, workers can begin laying the roof material across the top. Common choices include polycarbonate panels, cedar shingles, and corrugated metal sheets. Each material offers different levels of durability, weight, and weather resistance. Panels should overlap slightly at the edges to prevent water from seeping through the joints.
Flashing is applied along the wall junction to redirect rainwater away from the structure. A high-quality silicone sealant is then used along all seams, edges, and fastener points. Self-tapping screws with rubber washers help create watertight connections without cracking the panels.
After sealing, workers should inspect the slope angle to confirm water drains forward and away from the door. A minimum pitch of 10 degrees is generally recommended for adequate runoff.
Mount Your Door Canopy Safely to the Wall
After the roof is sealed and the slope is confirmed, the canopy frame must be anchored firmly to the wall. Masonry walls require hammer drill bits, masonry anchors, and lag bolts rated for exterior use. Wood-framed walls need screws driven directly into wall studs, located with a stud finder before drilling begins.
The mounting bracket position should align with the canopy’s rear beam, distributing weight evenly across multiple fastening points. Using at least four anchor points reduces stress on any single bolt. Galvanized or stainless steel hardware resists rust caused by outdoor moisture exposure.
A level confirms the canopy sits straight before all bolts are fully tightened. Once secured, each fastener should be checked for tightness, and silicone caulk should seal any gaps between the wall and the mounting bracket.
Paint, Seal, and Maintain Your Door Canopy Long-Term
Finishing the canopy with paint or sealant protects the wood or metal from rain, UV rays, and temperature changes. For wood canopies, an exterior-grade primer followed by acrylic latex paint provides solid coverage and flexibility. A clear waterproof sealant, such as Thompson’s WaterSeal, adds an extra moisture barrier over painted or stained surfaces.
Metal canopies benefit from rust-inhibiting primer and enamel spray paint rated for outdoor use. Reapplication depends on climate, but most sealants last two to three years before fading or cracking. Homeowners should inspect the canopy each spring, checking for peeling paint, soft wood, loose brackets, and pooled water. Replacing damaged caulk around mounting points prevents water intrusion into the wall. Consistent maintenance extends canopy life considerably and reduces costly repairs over time.
Frequently Asked Questions
Do I Need Planning Permission to Install a Door Canopy?
In most cases, a door canopy falls within permitted development rights and doesn’t require planning permission.
That said, homeowners in conservation areas or with listed buildings should check with their local planning authority before moving forward with any installation.
A quick call ahead of time saves the trouble of having to make changes after the canopy is already built.
How Much Does a DIY Door Canopy Typically Cost to Build?
You don’t need to spend a fortune to pull this off. Most DIY door canopies cost somewhere between $100 and $500 depending on the materials chosen.
Timber, polycarbonate sheets, and fixings make up the primary expenses here, with timber frames generally landing on the more budget-friendly end.
Shopping around for materials and taking advantage of seasonal sales can help keep the final cost even lower.
Can a Door Canopy Be Installed Over a Double Door?
Yes, installing a canopy over a double door is absolutely doable with the right planning.
The canopy’s width simply needs to extend beyond both doors, with structural support brackets mounted securely into the wall on each side.
Taking accurate measurements of the full double door span before cutting any lumber helps avoid a canopy that ends up too narrow for proper coverage.
Will a Door Canopy Affect My Home Insurance Policy?
It’s possible a door canopy could affect a home insurance policy, since insurers sometimes require notification of structural modifications like this one.
Failing to disclose the change could put coverage at risk down the line, which is a bigger headache than a quick phone call would have been.
Reaching out to the insurance provider before installation is the safest way to confirm compliance and avoid any surprises later.
How Long Does a DIY Door Canopy Typically Take to Complete?
Most DIY door canopies come together in one to two days from start to finish.
Simpler designs can sometimes wrap up in just a few hours, especially for anyone comfortable with basic tools and measurements.
More complex builds with decorative elements tend to stretch across a full weekend, so it’s worth planning the timeline around the specific design chosen.
Conclusion
Building a DIY door canopy is well within reach for most homeowners willing to put in a weekend of focused effort.
The right materials make a bigger difference than people expect going in. Pressure-treated lumber and galvanized hardware consistently outperform cheaper alternatives once weather starts testing the structure.
Accurate measurements matter just as much as material choice. A canopy built from careful planning tends to fit and function far better than one rushed through without a proper diagram.
Mounting deserves the same level of care as the build itself, since even a well-constructed frame will fail if it isn’t anchored securely to the wall.
Regular inspections and timely maintenance round out the process, keeping the canopy standing strong and looking sharp for years after the initial build.
Have questions about your own door canopy project? Share the details in the comments below.


