
Weekends have a way of disappearing without much to show for them. Scrolling through bedroom inspiration photos is easy. Actually doing something about it is harder, mostly because it feels like a bigger project than it needs to be.
The truth is some of the most satisfying transformations happen in a single afternoon with basic supplies and a clear plan. You do not need a contractor or a full overhaul.
The 50 ideas below actually deliver visible results without requiring professional skills or expensive tools.
Choosing the Right Project for Your Space
Fifty ideas is a lot to sort through, so narrow it down before you start.
Think about which part of your bedroom bothers you most right now. Is it the bare walls, the lack of storage, the lighting, or the overall feel of the space?
Starting with the thing that genuinely bothers you most will give you more motivation to finish and more satisfaction when it is done than picking a project simply because it looks good in photos.
50 DIY Bedroom Decor Ideas to Try This Weekend
Some of these projects take an afternoon. Others need a full weekend with drying time built in.
A few require basic tools and some prior experience, while others need nothing more than scissors, tape, and a bit of patience.
Read through a handful that catch your eye, check what supplies you already have at home, and commit to finishing one or two completely before moving on to the next. That approach produces far better results than starting five things at once and finishing none of them.
Create a Fabric Wall Accent With Wallpaper Paste
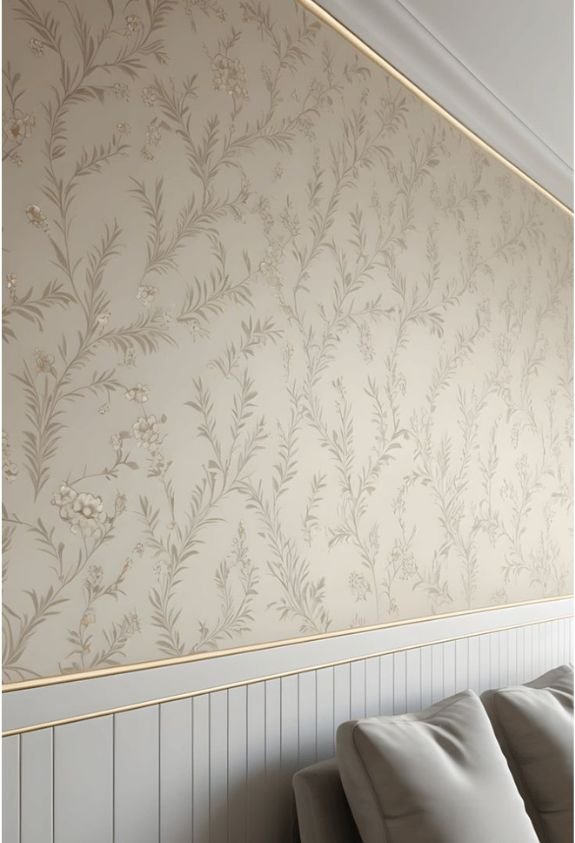
You can transform any bedroom wall with fabric and wallpaper paste—a budget-friendly alternative to traditional wallpaper. Start by selecting fabric that complements your décor, then cut it to fit your desired wall section.
Mix wallpaper paste according to package directions and apply it evenly to the wall using a roller or brush. Press your fabric onto the wet paste, smoothing out air bubbles as you work from top to bottom. Use a plastic scraper to eliminate wrinkles and guarantee proper adhesion.
Once dry, trim excess fabric with a utility knife along the edges. This technique creates a textured accent wall that adds visual interest and depth to your bedroom. You’ll achieve a polished look without the expense of hiring professionals or committing to permanent wallpaper.
Also read: 32 Luxury Bedroom Decor Ideas That Bring Hotel Vibes Home
Build a Floating Headboard From Reclaimed Wood
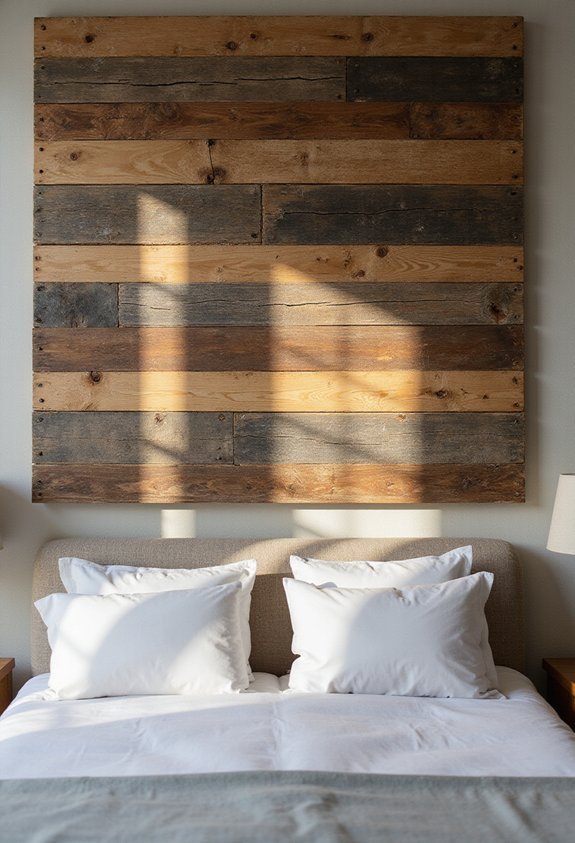
For a more dramatic focal point than a fabric accent wall, consider building a floating headboard from reclaimed wood. You’ll start by selecting weathered planks that complement your bedroom’s aesthetic, then arrange them into your desired pattern—whether horizontal, vertical, or mixed.
Next, you’ll mount a sturdy steel frame or wooden supports to your wall studs, ensuring they’re level and secure. Attach your reclaimed wood planks to this framework, spacing them as tightly or loosely as you prefer.
This project transforms your bedroom instantly. The floating effect creates visual interest without consuming floor space, while reclaimed wood adds warmth and character. You can leave the wood natural or stain it to match your décor. The entire project typically takes one weekend, making it perfect for quick bedroom transformation.
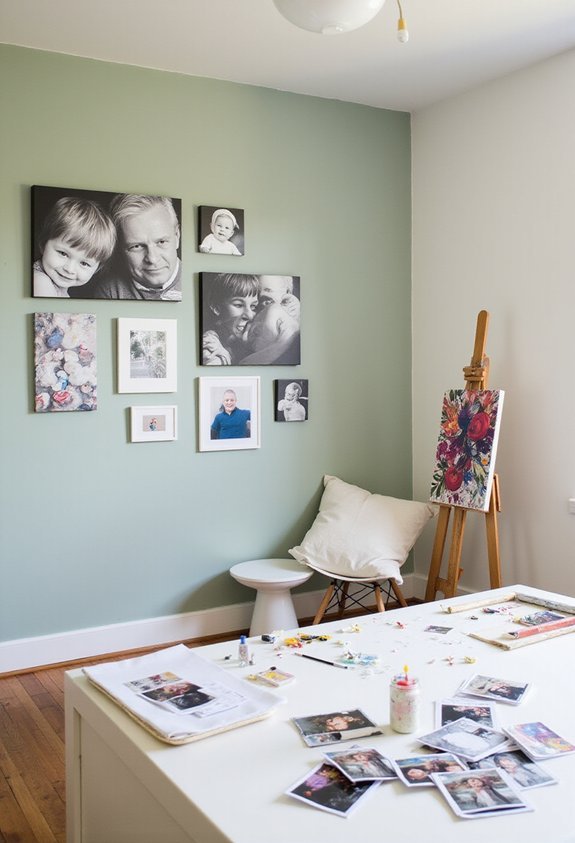
Design a Gallery Wall With Mixed Frames
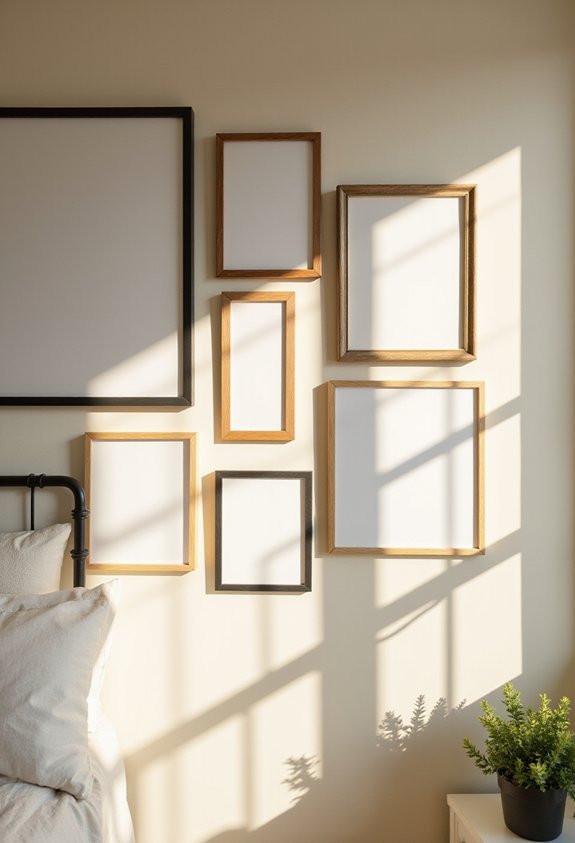
After completing your floating headboard, a gallery wall adds another dimension to your bedroom’s visual appeal. Start by gathering frames in varying sizes and finishes—wood, metal, and painted options work well together. Arrange them on your floor first to find a layout you love before hanging anything.
Mix artwork styles by combining photographs, prints, and sketches. This eclectic approach creates visual interest and reflects your personality. Leave roughly two inches between frames for breathing room, though you can adjust spacing based on your preference.
Use a level and measuring tape to guarantee straight placement. Mark hole positions with painter’s tape before hammering nails. Your gallery wall transforms an empty wall into a personalized focal point that complements your floating headboard beautifully.
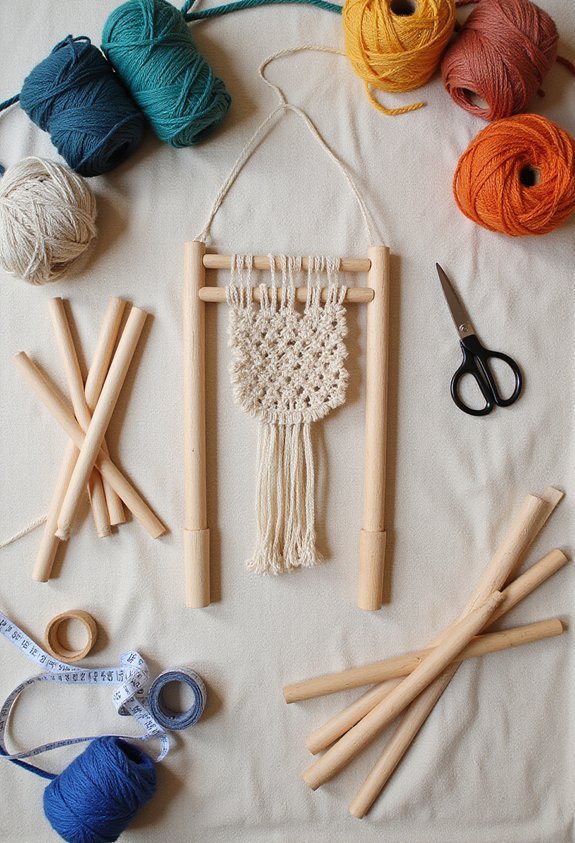
Make a Macramé Wall Hanging in One Afternoon
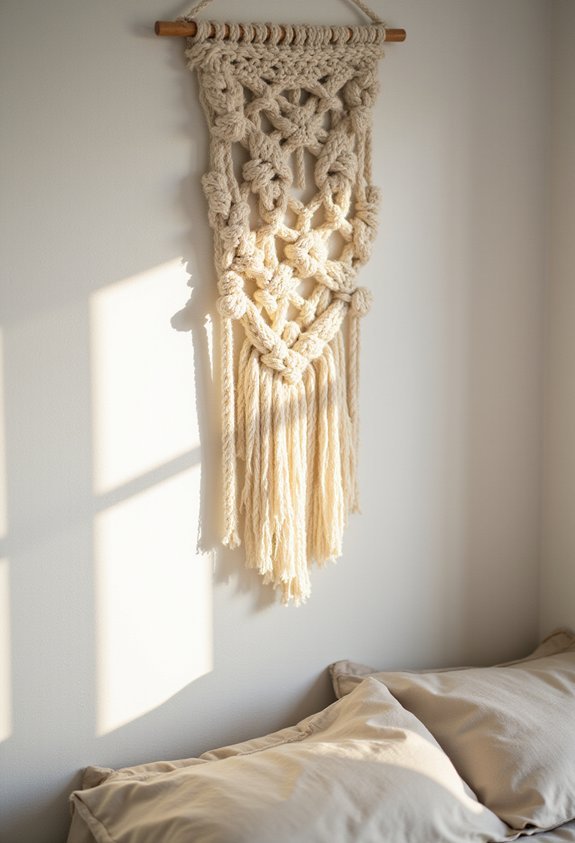
While your gallery wall establishes visual interest through curated frames, a macramé wall hanging adds organic texture and bohemian charm to complete your bedroom’s aesthetic. You’ll need cotton cord, scissors, and a wooden dowel to get started.
Begin by cutting eight strands of cord, each about three feet long. Fold them in half around your dowel, creating sixteen working strands. Use basic knots—square knots and half hitches—to form geometric patterns. Work systematically from top to bottom, tightening knots as you progress.
This project requires minimal skill but delivers maximum impact. Most people finish within two to three hours, even without prior macramé experience. Trim the bottom fringe at varying lengths for an authentic bohemian look. Hang your finished piece above your nightstand or dresser for an instant bedroom upgrade.
Paint a Geometric Accent Wall Pattern
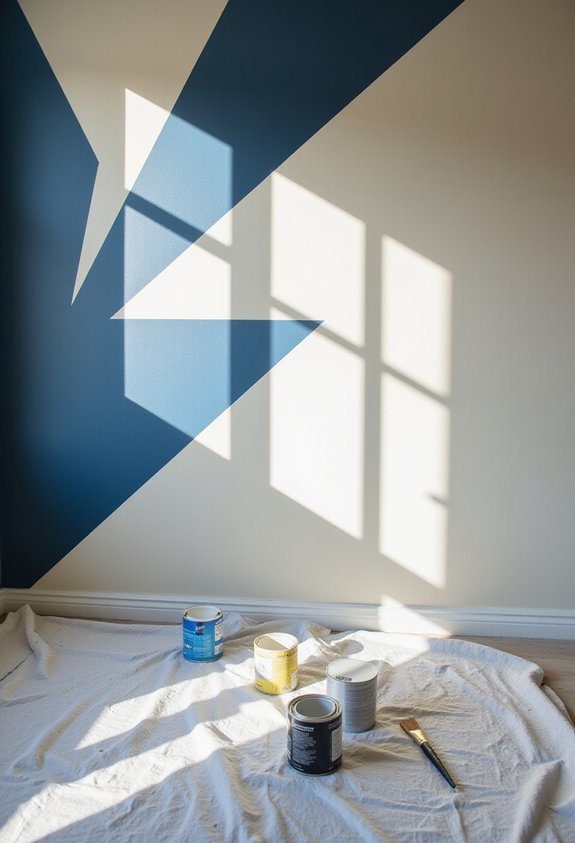
Geometric patterns transform a bedroom wall into a modern focal point that rivals your macramé hanging in visual impact. You’ll need painter’s tape, two to three complementary paint colors, and a steady hand.
Start by sketching your design lightly in pencil. Triangles, chevrons, and hexagons work particularly well in bedrooms. Apply painter’s tape along your pattern lines, pressing firmly to prevent paint bleeding. Paint your base color first, let it dry completely, then tape off sections for your secondary colors.
Remove the tape while paint is still slightly tacky for clean edges. This project takes roughly four to six hours, including drying time. The result? A personalized accent wall that showcases your creativity and instantly elevates your bedroom’s aesthetic without requiring professional help or significant expense.
Upgrade Your Headboard With Upholstered Panels
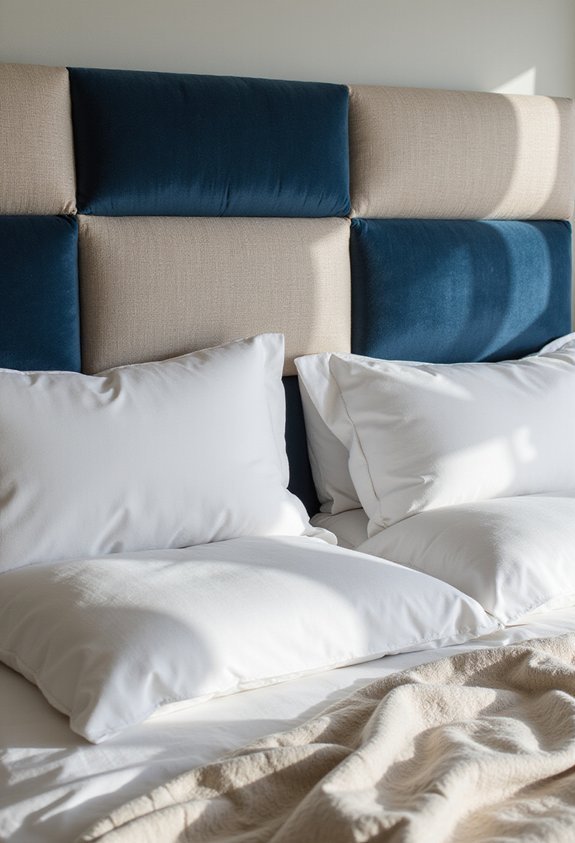
Upholstered headboard panels can transform your bed into a luxurious focal point that anchors the entire room. You’ll need fabric, batting, plywood, and a staple gun to create this statement piece.
Start by cutting plywood into your desired panel shapes and sizes. Layer batting over the plywood for cushioning and comfort. Stretch your chosen fabric tautly across the batting, stapling it securely to the back side. You can create individual panels or one large headboard, depending on your vision.
Install the panels directly to your wall using brackets or adhesive strips. Consider mixing fabrics, textures, or patterns for visual interest. You might pair velvet with linen or combine complementary colors for depth.
This weekend project instantly elevates your bedroom’s aesthetic while providing practical comfort for reading in bed.
String Fairy Lights Around Your Bed Frame
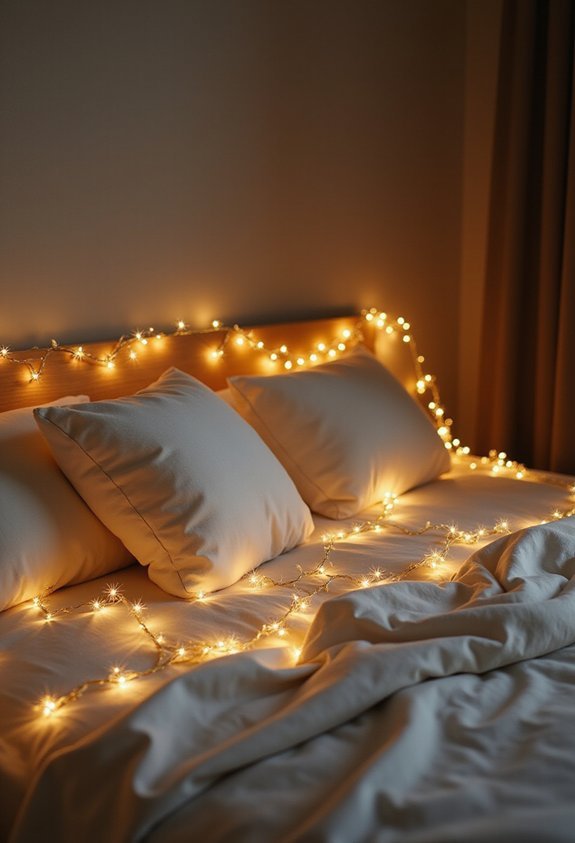
If you’re seeking a soft, ambient glow that transforms your bedroom into a cozy retreat, fairy lights offer an effortless solution. You’ll need warm white or color-changing string lights, adhesive clips, and a power source nearby.
Start by mapping your desired path along the bed frame. You can drape lights horizontally across the headboard, wrap them around the frame’s perimeter, or create a canopy effect above. Use adhesive clips to secure the wire safely without damaging your furniture.
Position lights at consistent intervals for a polished appearance. For safety, guarantee your power outlet’s within reach and use battery-operated lights if outlets aren’t convenient. Test all connections before finalizing placement.
The result? An enchanting focal point that instantly elevates your bedroom’s ambiance while requiring minimal effort.
Install Floating Shelves Above Your Nightstand
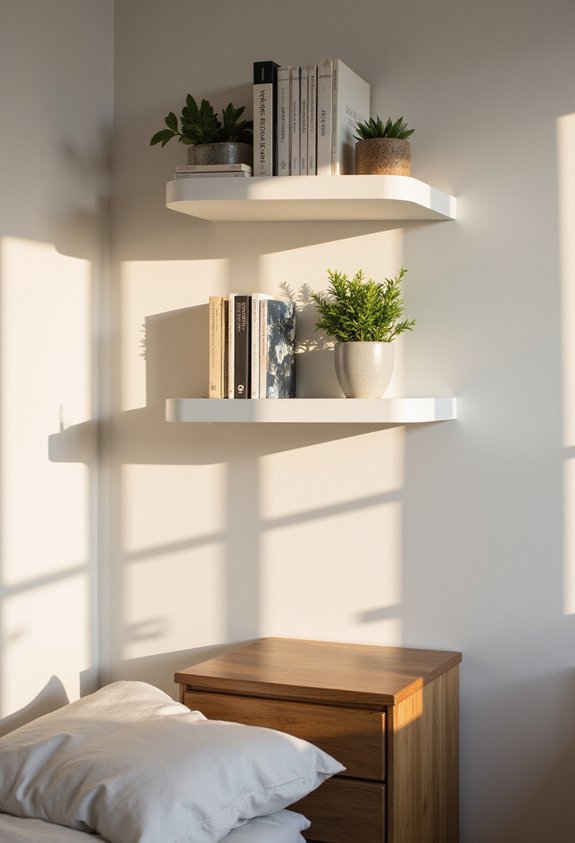
Now that you’ve established ambient lighting as your bedroom’s focal point, you’ll want to add functional storage that complements that glow. Floating shelves above your nightstand offer the perfect solution.
Start by locating studs in your wall using a stud finder. Mark your shelf placement at eye level, ensuring it’s level with a spirit level before drilling pilot holes. Use appropriate anchors if you’re not hitting studs directly.
Install the shelf brackets securely, then position your shelves. Arrange decorative items strategically—small plants, books, or framed photos work well. Keep the arrangement balanced and uncluttered to maintain visual harmony with your string lights.
This project typically takes under an hour and transforms your nightstand area into an organized, stylish display that enhances your bedroom’s overall aesthetic.
Craft a Dreamy Canopy Using Sheer Fabric
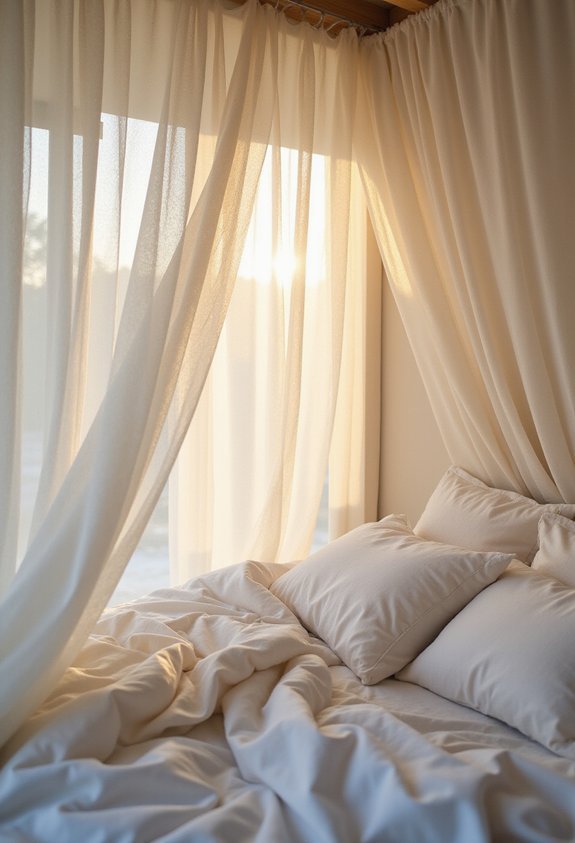
Once you’ve maximized your nightstand’s vertical space, you’ll want to draw attention upward with a canopy that adds romance and softness to your bedroom. You don’t need expensive materials or professional installation—just sheer fabric, a curtain rod, and basic hardware.
Start by mounting a rod above your bed using sturdy brackets. Drape lightweight fabric like tulle, gauze, or voile across the rod, allowing it to cascade down the sides. You can gather the ends with clips or tie them back for an ethereal effect.
This project takes just a few hours and transforms your space dramatically. The sheer fabric filters light beautifully while creating an intimate retreat. You’ll find countless fabric options at craft stores, giving you endless customization possibilities that suit your bedroom’s aesthetic perfectly.
Paint Your Ceiling for Instant Drama
While your canopy draws eyes upward, a painted ceiling truly commands attention and transforms your entire bedroom’s atmosphere. You’ll create instant drama by selecting bold colors or soft hues that complement your walls.
Start by preparing your space—remove furniture and lay drop cloths to protect floors. Use a sturdy ladder and invest in a quality roller with an extension pole to minimize strain. Apply primer first, then two coats of your chosen paint for even coverage.
Consider deep blues, soft grays, or warm terracottas to add sophistication. If you’re feeling adventurous, try a ombré effect or metallic accents. A painted ceiling elevates your room’s design without requiring significant effort or expense, making it the perfect weekend project.
Create Removable Wall Decals From Contact Paper
If you’ve mastered painted ceilings and want another budget-friendly way to personalize your space, contact paper decals offer endless creative possibilities without permanent commitment. You’ll find contact paper in various patterns at dollar stores or online retailers, making experimentation affordable.
Start by sketching your design on the paper’s backing, then carefully cut it out. Peel away the backing and apply the decal to your wall, smoothing out air bubbles with a credit card or squeegee. The adhesive holds firmly yet removes cleanly when you’re ready for a change.
Layer multiple decals to create geometric patterns, nature scenes, or motivational quotes. You can combine solid colors with patterned sheets for visual interest. This approach works on dressers, mirrors, and headboards too, giving you complete bedroom transformation flexibility without wall damage or long-term regrets.
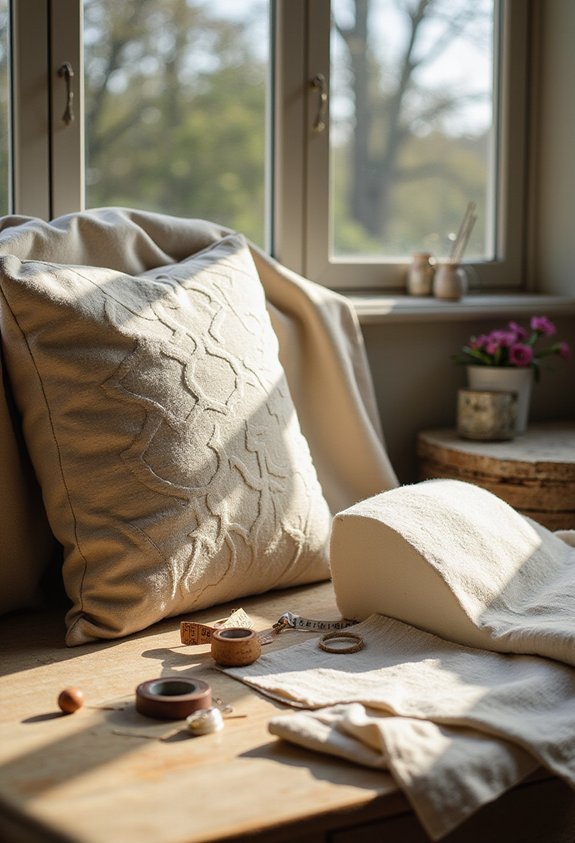
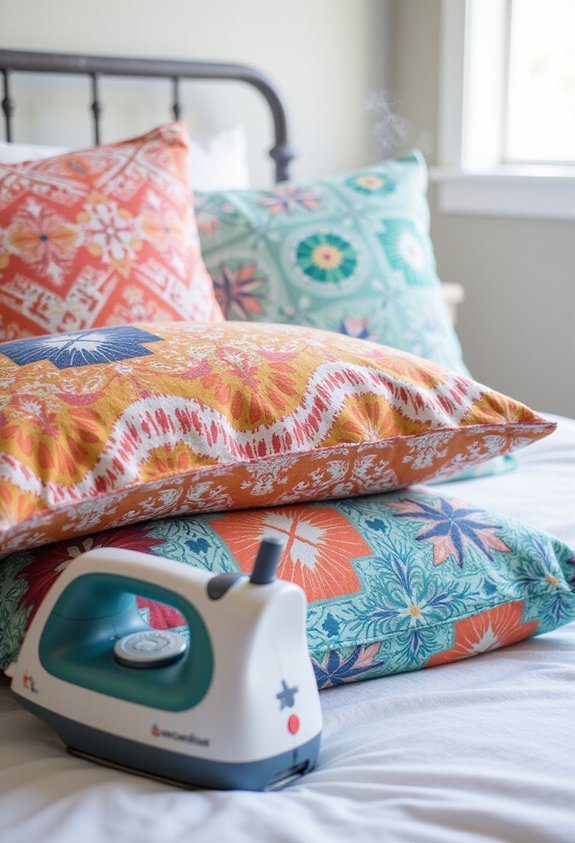
Make DIY Throw Pillows With Custom Covers
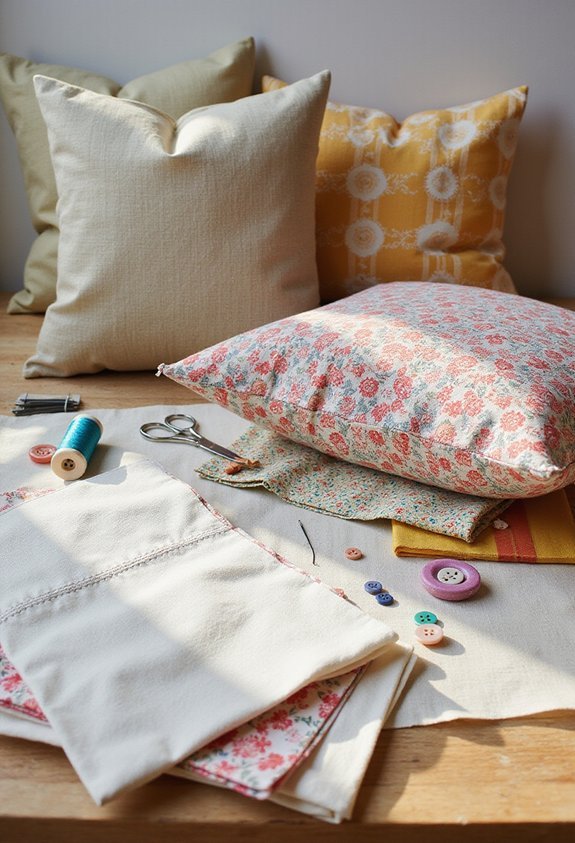
Now that you’ve personalized your walls, it’s time to add comfort and style to your bed with custom throw pillows. You’ll need fabric, a pillow form, needle, thread, and scissors. Select fabric that complements your wall decals and bedroom aesthetic.
Cut two fabric squares slightly larger than your pillow form. Place them with the right sides together, then sew three sides using a half-inch seam allowance. Turn the fabric right-side out and insert your pillow form. Fold the remaining edges inward and hand-stitch the opening closed.
For added flair, consider embellishing your pillows with fabric paint, embroidery, or iron-on patches that coordinate with your wall design. This approach lets you create matching sets that tie your entire bedroom design together cohesively.
Build a Bed Skirt From Fabric Scraps
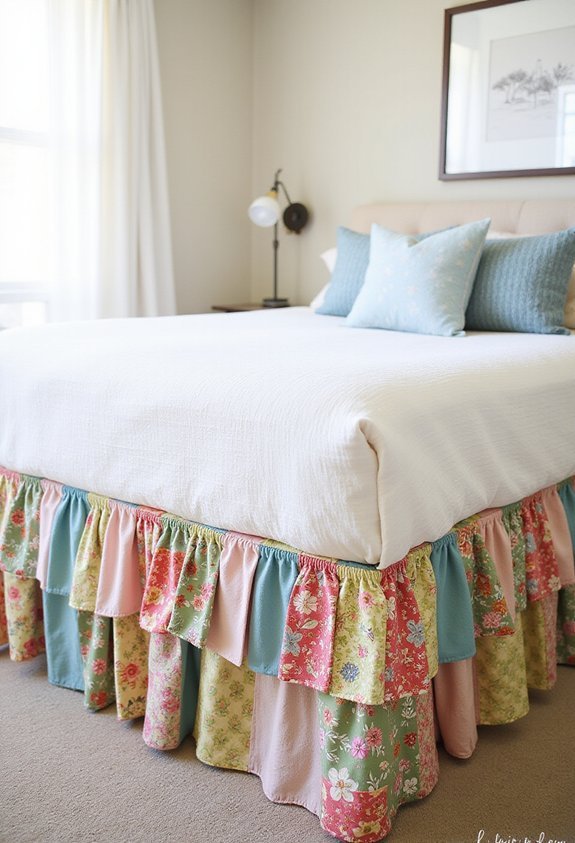
Rather than discarding leftover fabric from your throw pillow project, you can transform those scraps into a stylish bed skirt that adds dimension and visual interest to your bedroom. Start by measuring your bed’s length, width, and desired drop length. Cut your fabric scraps into strips and sew them together end-to-end, creating one long panel.
Attach this panel to a basic muslin backing using a sewing machine or fabric glue. Install the bed skirt by securing it to your bed frame with pins or adhesive strips.
You can arrange your fabric pieces in patterns—alternating colors, mixing textures, or creating a patchwork design. This budget-friendly project breathes new life into materials you’d otherwise waste while customizing your bedroom’s aesthetic.
Design Custom Lampshades With Decorative Paper
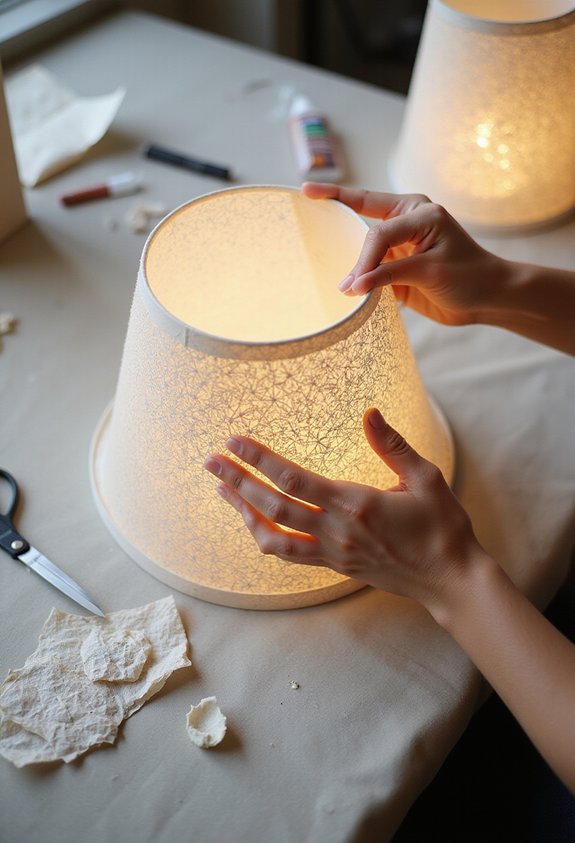
Because standard lampshades can feel bland and impersonal, you can easily transform them into striking focal points using decorative paper and basic adhesives. Start by selecting patterned or textured paper that complements your bedroom’s color scheme. Measure your lampshade’s dimensions carefully, then cut the paper to fit.
Apply a thin layer of spray adhesive or craft glue to the shade’s exterior surface. Smooth the paper onto the shade, working out air bubbles with a soft brush or cloth. For added durability, seal the edges with clear tape.
You can layer multiple paper types for visual depth or create cutout designs that cast beautiful shadows when illuminated. This project transforms your lighting instantly while protecting your shade from damage.
Stencil a Feature Wall in Your Favorite Color
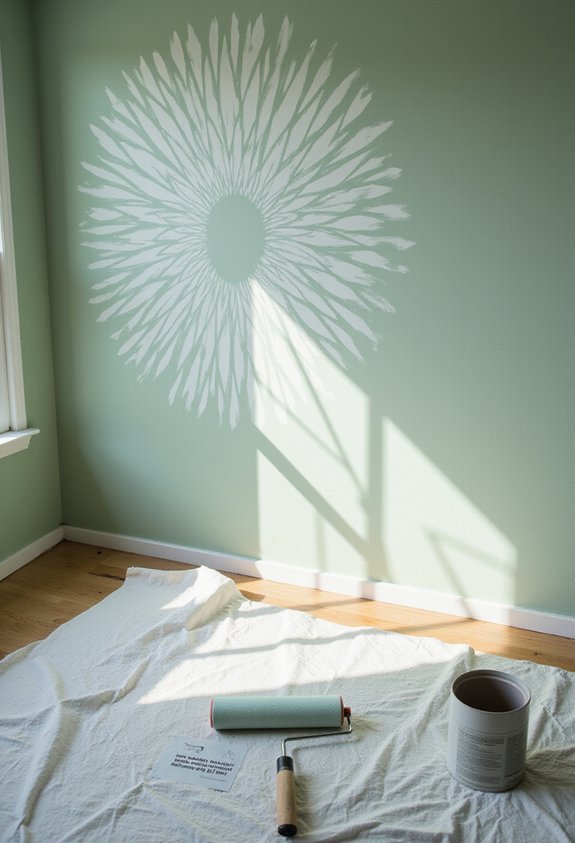
While paint alone can transform a room, stenciling adds personalized patterns and visual interest that elevate your bedroom’s design. You’ll start by selecting a feature wall and choosing a stencil pattern that complements your aesthetic. After prepping the wall with primer, you’ll tape your stencil securely in place.
Using a sponge or roller, you’ll apply your chosen paint color through the stencil openings with controlled, dabbing motions. Work methodically across the wall, repositioning the stencil as you progress. Remove the stencil carefully to reveal crisp, clean edges.
For added depth, you can layer multiple colors or combine different stencil patterns. This budget-friendly project transforms an ordinary wall into a striking focal point that reflects your personal style without requiring professional expertise.
Create a Pegboard Organizer for Jewelry and Accessories

After transforming your walls with color and pattern, you can organize your accessories with a custom pegboard display that’s both functional and stylish. Start by selecting a pegboard size that fits your wall space, then paint it to complement your bedroom’s aesthetic. Install it securely using appropriate wall anchors or studs.
Arrange hooks, baskets, and shelves on the pegboard to accommodate your jewelry, scarves, and belts. Use small hooks for necklaces and bracelets, deeper hooks for bags, and shallow baskets for rings and earrings. This setup keeps everything visible and easily accessible while adding visual interest to your room.
You’ll appreciate how the pegboard transforms clutter into an organized, decorative element that showcases your accessories while freeing up drawer and dresser space.
Make a Sliding Barn Door for Closet Storage
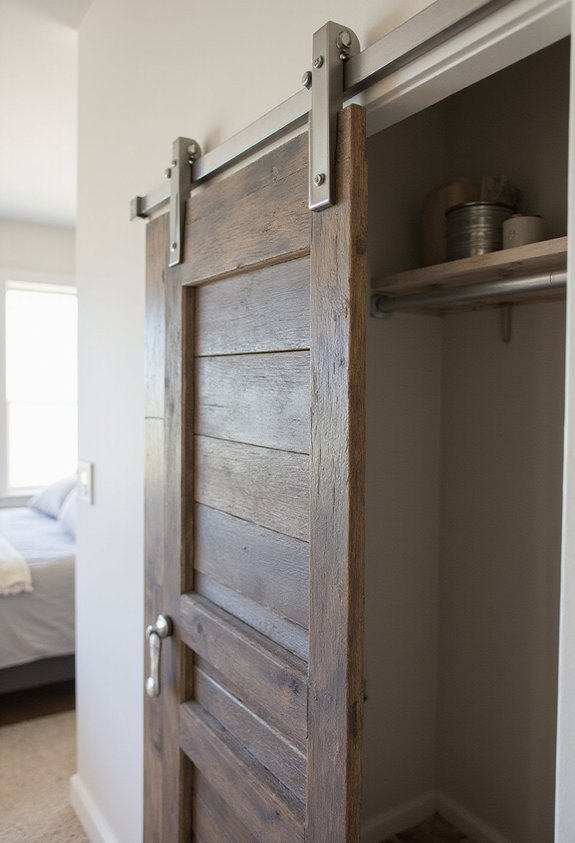
A sliding barn door adds rustic charm while maximizing your closet space and eliminating the swing radius of traditional hinged doors. You’ll need a barn door track kit, wood panels, and basic tools like a drill and level.
Start by measuring your closet opening and selecting or building your door panels. Install the track hardware securely at the top of the opening, ensuring it’s perfectly level. Attach the roller brackets to your door panels, then hang them on the track.
Adjust the rollers so your door glides smoothly without binding. Add a floor guide to keep the bottom stable. Finish with paint or stain matching your bedroom aesthetic.
This project transforms your closet while freeing valuable floor space for additional furniture or movement.
Install Rope Shelving for Industrial Vibes
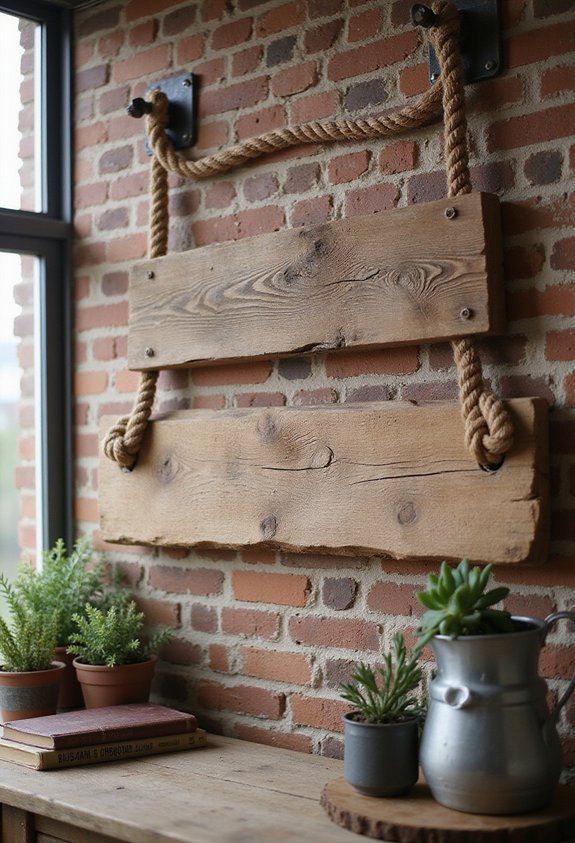
If you’re drawn to industrial aesthetics, rope shelving offers an affordable way to add character and functionality to your bedroom. You’ll need thick manila or jute rope, wooden shelves, and sturdy mounting brackets.
Start by measuring your wall space and marking where you’ll install brackets. Secure them firmly into wall studs for maximum stability. Cut your rope to desired lengths, then wrap it tightly around wooden shelves, securing the ends with knots or wood glue.
Attach the rope-wrapped shelves to your brackets, ensuring they’re level. You can arrange multiple shelves at varying heights for visual interest. Fill them with books, plants, or decorative boxes that complement your industrial theme.
This project transforms plain walls while providing practical storage without expensive renovations.
Craft Woven Wall Art From Yarn and Dowels
You’ll find weaving one of the easiest ways to create textured wall art that rivals gallery pieces. Start by selecting wooden dowels in your preferred diameter and securing them horizontally to your wall with brackets. Choose yarn colors that complement your bedroom palette—consider mixing textures like cotton, wool, and jute for visual interest.
Begin weaving by tying your yarn to the top dowel, then interlace it through the vertical strings you’ve strung between dowels. Vary your weaving patterns: try diagonal lines, alternating colors, or loose loops for dimension. You don’t need experience—mistakes add character.
Once finished, trim excess yarn and step back to assess your creation. This project costs minimal money, requires just an afternoon, and transforms blank walls into personalized focal points that reflect your unique style.
Paint Nightstands With Ombre Gradient Effects
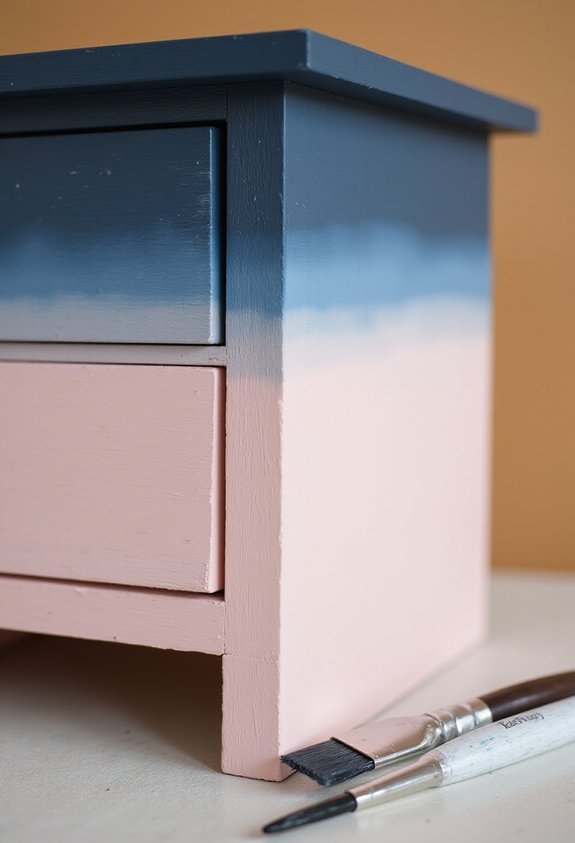
Ombre gradient nightstands can elevate your bedroom’s aesthetic with minimal artistic skill required. You’ll need acrylic paint in two complementary colors, a sponge, and a spray bottle filled with water.
Start by applying your lighter shade as the base coat. Once dry, pour your darker color onto a plate. Dampen your sponge with water, dip it into the darker paint, and gently dab it onto the nightstand’s top edge. Work downward, gradually blending and reducing pressure as you descend. The water on your sponge helps create smooth shifts between colors.
Build layers gradually—multiple light applications look better than one heavy coat. Allow each layer to dry before adding more depth. You’ll achieve a professional-looking gradient effect that transforms ordinary furniture into a stylish bedroom focal point.
Create a Cork Board Wall for Inspiration and Planning
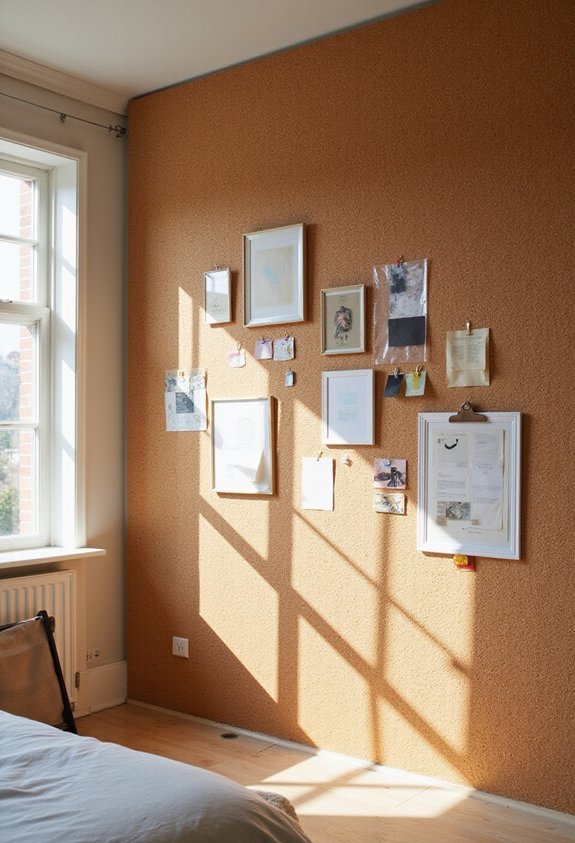
A cork board wall can transform your bedroom into a personalized hub for creativity and organization. You’ll start by measuring your wall space and purchasing cork tiles or sheets from a hardware store. Apply adhesive backing or wall-safe glue, then arrange them in your desired pattern—grid, mosaic, or full coverage.
Once installed, you can pin inspiration photos, fabric swatches, mood boards, and motivational quotes. This functional display keeps your vision board visible and accessible. You’ll organize your ideas by category: design inspiration, goals, color palettes, or project plans.
The beauty of a cork board wall lies in its flexibility. You can rearrange pins whenever you like, refresh your inspiration, and adapt it to your changing interests. It’s both decorative and practical.
Build a Window Seat Cushion for Extra Seating
Window seat cushions combine comfort with functionality, transforming an overlooked spot into your bedroom’s coziest retreat. You’ll need foam padding, fabric, and a sewing machine to get started.
First, measure your window seat precisely. Cut foam to fit the dimensions, then select fabric that complements your bedroom aesthetic. Cotton blends work well for durability and easy cleaning.
Layer your fabric right-side down, add foam in the center, then fold edges over and secure with stitching. You can hand-sew if you prefer a personal touch.
Consider adding piping or trim around the edges for a polished appearance. Removable covers make maintenance simple—just unzip and wash when needed.
This project takes just an afternoon and instantly creates a functional seating spot that invites you to relax with a book or morning coffee.
Make Peel-and-Stick Tile Accents for Focal Points
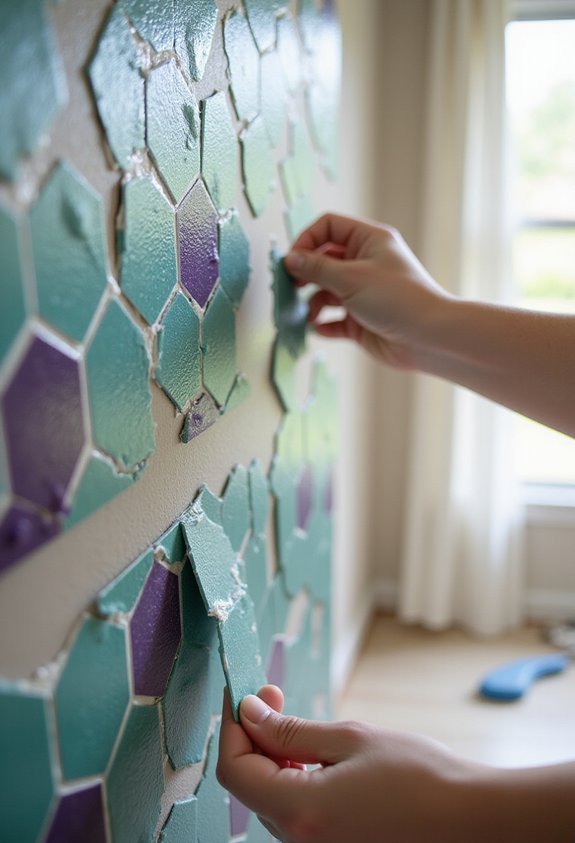
If you’re looking to add visual interest without major renovation, peel-and-stick tiles offer an instant transformation. You can create stunning focal points by applying them to accent walls, headboards, or even bathroom vanities within your bedroom space.
Choose patterns that complement your existing décor—geometric designs energize modern rooms, while Moroccan or floral tiles add bohemian flair. You’ll appreciate how these tiles work on virtually any smooth surface: drywall, tile, or painted wood.
Installation takes minutes. Simply measure your space, cut tiles to fit, and press them firmly into place. No adhesive, grout, or professional help needed.
The best part? You can update your design seasonally or whenever inspiration strikes. Peel-and-stick tiles deliver high-impact style without the commitment of permanent changes.
Design a Moon Phase Wall Mural With Chalk Paint
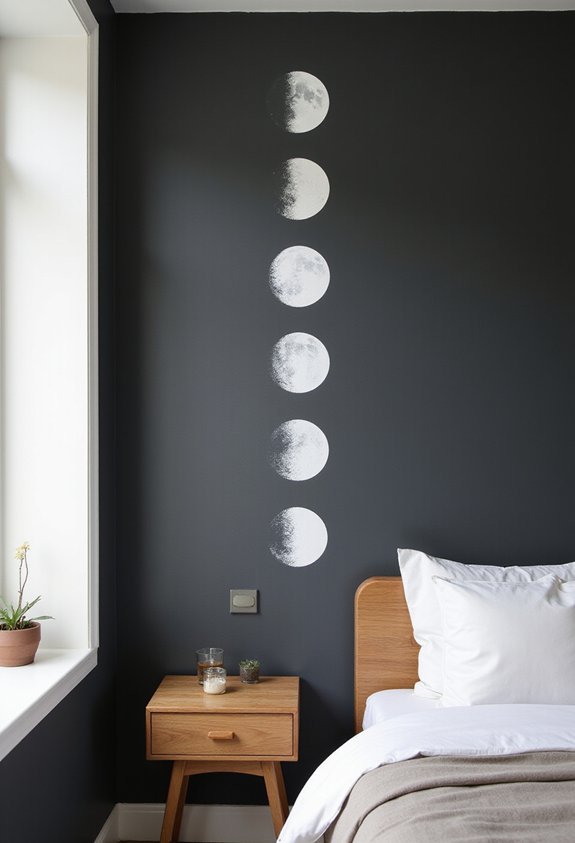
Creating a moon phase wall mural brings celestial elegance to your bedroom while showcasing your artistic side. You’ll start by sketching your design lightly in pencil across your chosen wall space. Map out eight moon phases in a circular arrangement or linear pattern, depending on your preference.
Next, apply chalk paint in white, cream, or silver to create each phase. You can use brushes for detailed work or sponges for softer edges. Layer different shades to add dimension and depth to your mural.
Once your design dries, consider adding constellation dots or delicate stars between the phases. A clear matte sealant protects your artwork while maintaining that coveted chalky finish. This stunning focal point transforms your bedroom into a peaceful, starlit sanctuary.
Create Fabric-Covered Storage Boxes Under the Bed
While your moon phase mural captures attention overhead, you’ll want to maximize the space below with practical storage solutions. Fabric-covered storage boxes under your bed offer an ideal way to organize items while maintaining your room’s aesthetic.
Start by measuring your under-bed space and selecting appropriately sized boxes. Choose fabric that complements your bedroom’s color scheme—consider cotton, linen, or decorative upholstery material. Wrap each box tightly, securing the fabric with fabric glue or a hot glue gun at the corners and edges.
Label each box clearly so you can identify contents without removing them. Store seasonal clothing, extra bedding, or books inside. These covered boxes keep dust away from your belongings while creating a cohesive, finished look that ties your room’s design together beautifully.
Install LED Strip Lighting Behind Your Headboard
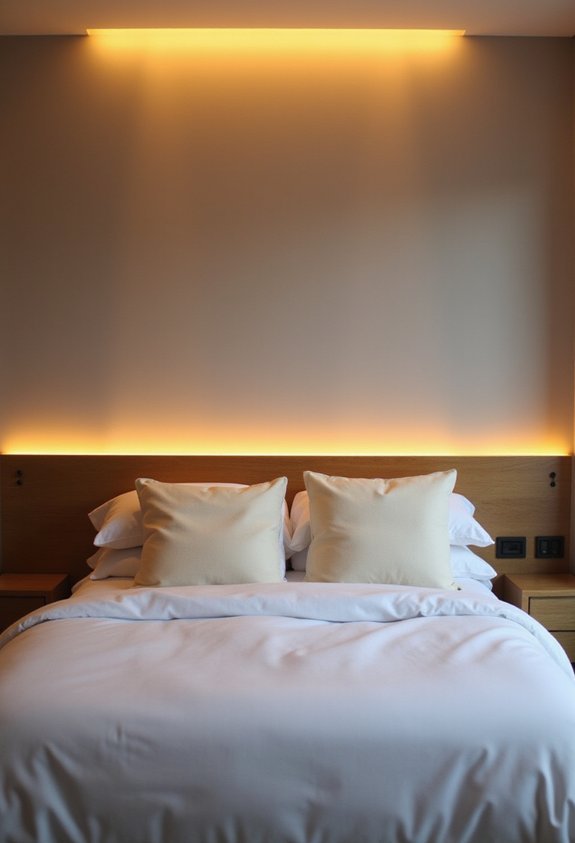
Now that you’ve organized your under-bed storage, you’ll want to draw attention upward with ambient lighting. Installing LED strip lights behind your headboard transforms your bedroom into a cozy retreat while adding functional illumination.
Start by measuring your headboard’s dimensions and purchasing adhesive-backed LED strips that match your desired color temperature. Clean the wall surface thoroughly to guarantee proper adhesion. Peel back the backing and carefully apply the strips along the top and sides of your headboard, pressing firmly as you go.
Connect the strips to a power source—many kits include USB adapters or battery packs for flexibility. Consider installing a remote control or smart bulb option to adjust brightness and colors from bed.
This simple upgrade creates dramatic visual depth while providing practical task lighting for reading.
Make a Mirror Wall to Amplify Light and Space
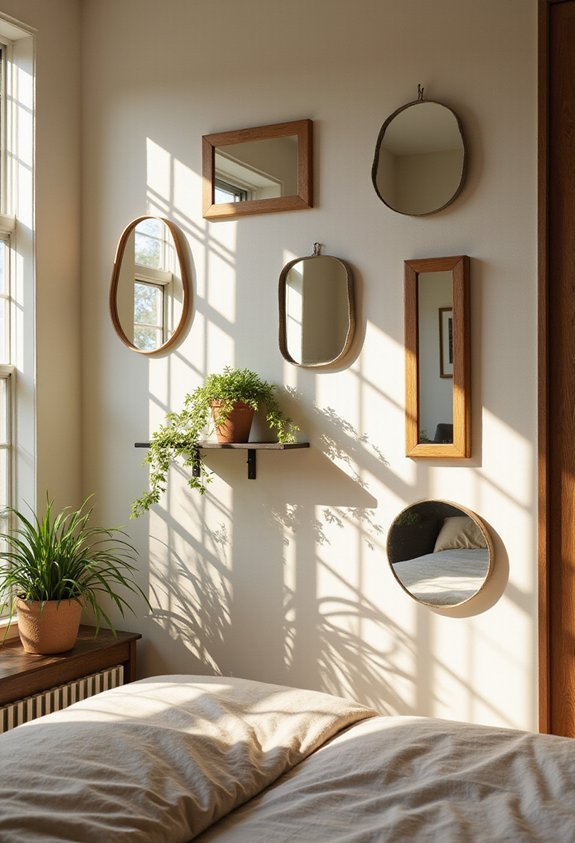
Mirrors are one of the most effective tools for transforming a bedroom’s perceived size and brightness. You can create a stunning mirror wall by arranging various sizes and shapes across one wall to reflect natural light throughout your space. Start by selecting a focal wall opposite your windows to maximize light reflection. You’ll want to use adhesive-backed mirror tiles for easy installation without drilling holes. Arrange them in patterns—geometric grids, staggered layouts, or clustered designs—depending on your aesthetic preference. This DIY project takes just a few hours and costs considerably less than professional installations. The result? Your bedroom instantly feels airier, brighter, and more spacious. Plus, mirrors add visual interest while reflecting your LED lighting beautifully.
Craft a Tassel Garland for Above Your Bed
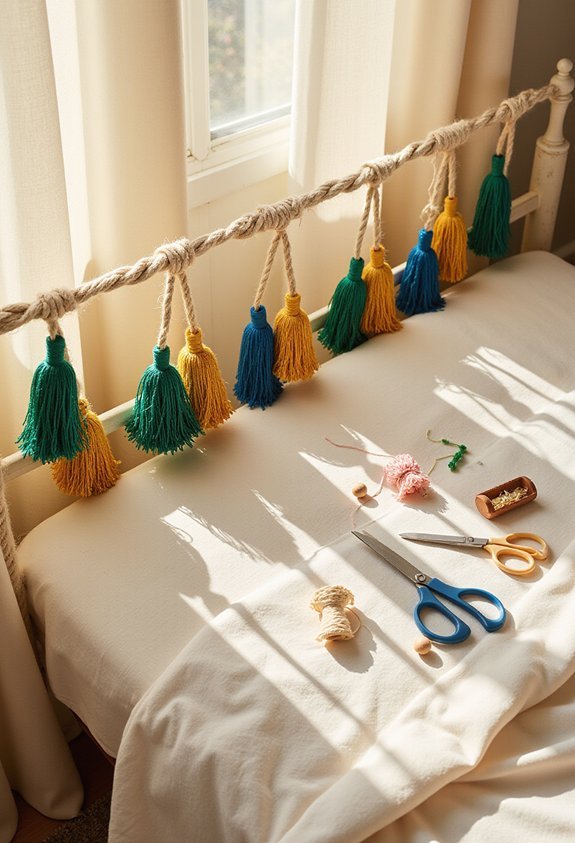
If you’re looking for an affordable way to add texture and visual appeal to your bedroom, a tassel garland is the perfect solution. You’ll need yarn, scissors, a measuring tape, and a sturdy string or twine for hanging.
Start by cutting yarn into uniform lengths—typically four to six inches. Fold each strand in half and tie it securely onto your base string, spacing them about one inch apart. Vary your yarn colors to create visual interest and complement your bedroom’s palette.
Once you’ve attached all your tassels, trim them to your desired length for a polished look. Install the garland above your bed using removable adhesive hooks or nails. This simple project takes just an hour and instantly transforms your space with handmade charm.
Paint a Mural of Your Favorite Quote or Saying
Since words have the power to inspire you daily, painting a motivational quote directly onto your bedroom wall creates a personalized focal point that’s both meaningful and visually striking. You’ll start by selecting a quote that resonates with you, then sketch it lightly in pencil across your chosen wall space.
Consider the font style—whether you prefer elegant script or bold block letters—and use painter’s tape to guarantee clean edges. Apply acrylic paint in your preferred color, working steadily to maintain consistent lettering. You can add decorative elements like small illustrations or geometric shapes around the text.
This project takes just a few hours and transforms your bedroom into a space filled with daily motivation, making every morning a reminder of what matters most to you.
Build a Rustic Ladder Shelf for Blanket Display
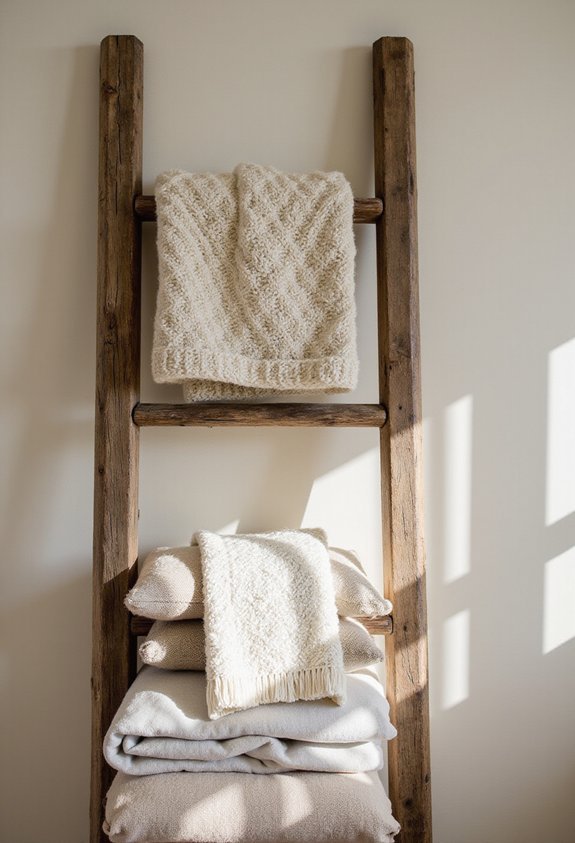
A rustic ladder shelf offers both functional storage and aesthetic charm to any bedroom. You’ll need two wooden ladders, sturdy shelves, and basic tools to get started.
Begin by positioning your ladders parallel to each other against the wall, ensuring they’re level and secure. Attach wooden shelves horizontally between the ladder rungs at your desired heights. You can space them 12-18 inches apart depending on your blanket thickness.
Sand down any rough edges and apply a weathered stain or paint to match your bedroom’s aesthetic. This rustic finish enhances the charm while protecting the wood.
Once complete, drape your favorite cozy blankets across the shelves for both display and easy access. This project transforms ordinary storage into an eye-catching focal point that’s practical and visually appealing for weekend relaxation.
Create a Botanical Wall With Hanging Planters

Transform your bedroom walls into a lush green sanctuary by incorporating hanging planters filled with your favorite botanical specimens. You’ll create visual interest while improving air quality with minimal effort.
Start by selecting lightweight planters and sturdy wall hooks rated for your plants’ combined weight. Choose low-maintenance varieties like pothos, string of pearls, or snake plants that thrive in indoor conditions. Arrange them at varying heights to establish a dynamic focal point above your nightstand or dresser.
Install hooks securely into wall studs or use heavy-duty anchors for drywall. Space planters twelve to eighteen inches apart to prevent crowding. Water your plants consistently but allow soil to dry between waterings.
This botanical wall instantly elevates your bedroom’s aesthetic while requiring just weekly maintenance.
Make Custom Curtain Rods From Branches and Dowels
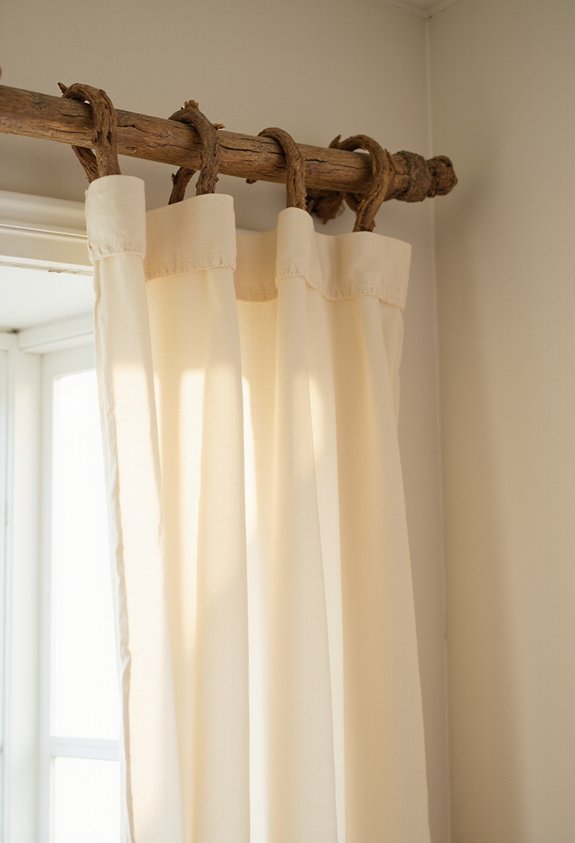
You can craft unique curtain rods by combining natural branches with wooden dowels, creating a rustic focal point that complements your botanical wall. Start by selecting sturdy branches that match your décor’s color palette.
Sand them smooth to prevent splinters and snagging fabric. Drill holes through both ends of your branch, then insert wooden dowels that’ll extend into wall-mounted brackets. These dowels provide stability and support your curtains’ weight. Secure everything with heavy-duty brackets rated for your curtains’ load.
You’ll want to measure twice before drilling—precision matters here. Consider staining or painting your branch to unify it with your bedroom’s existing finishes. This weekend project costs minimal money while delivering maximum visual impact and that coveted natural aesthetic.
Design a Constellation Ceiling With Glow-In-The-Dark Paint
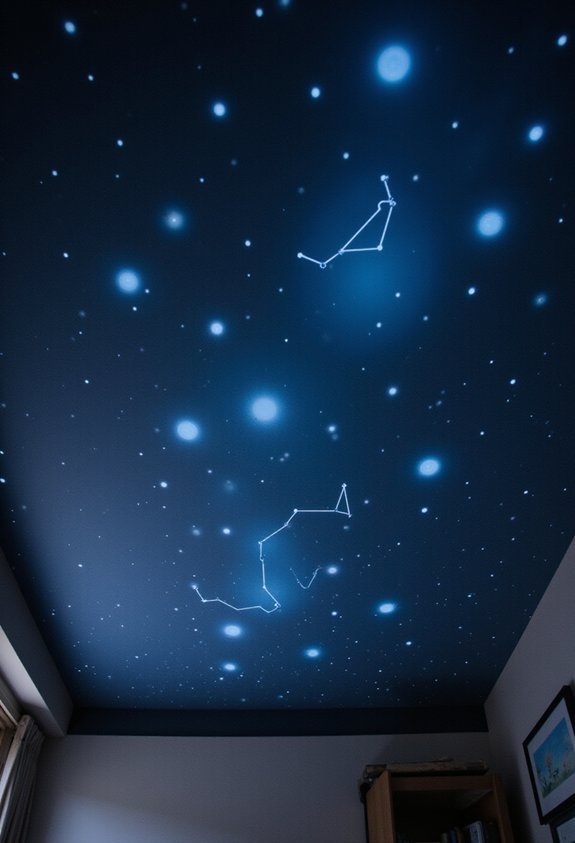
While branch curtain rods ground your bedroom with natural textures, your ceiling offers an entirely different canvas for creativity. You’ll transform your space into a nighttime sky by mapping out constellation patterns and marking them with glow-in-the-dark paint.
Start by researching your favorite constellations and lightly sketching their positions on your ceiling with pencil. Use a ruler for accuracy. Next, apply glow-in-the-dark paint to each marked point, creating stars of varying sizes for a natural appearance. Connect the dots with thin lines if you’d like to outline the constellation shapes.
The result’s a mesmerizing display that’ll illuminate your bedroom after dark. This project costs minimal money and takes just one weekend to complete, making it perfect for renters and homeowners alike.
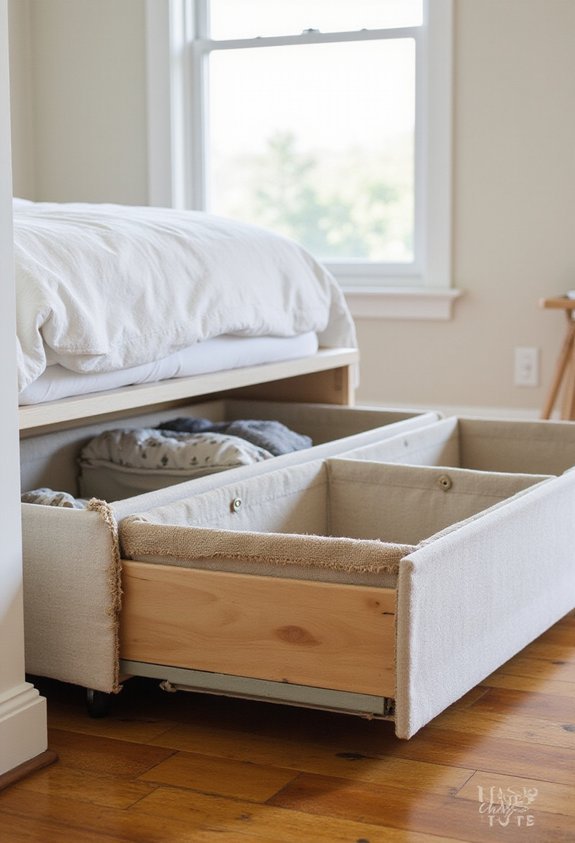
Build Underbed Drawers From Wooden Crates
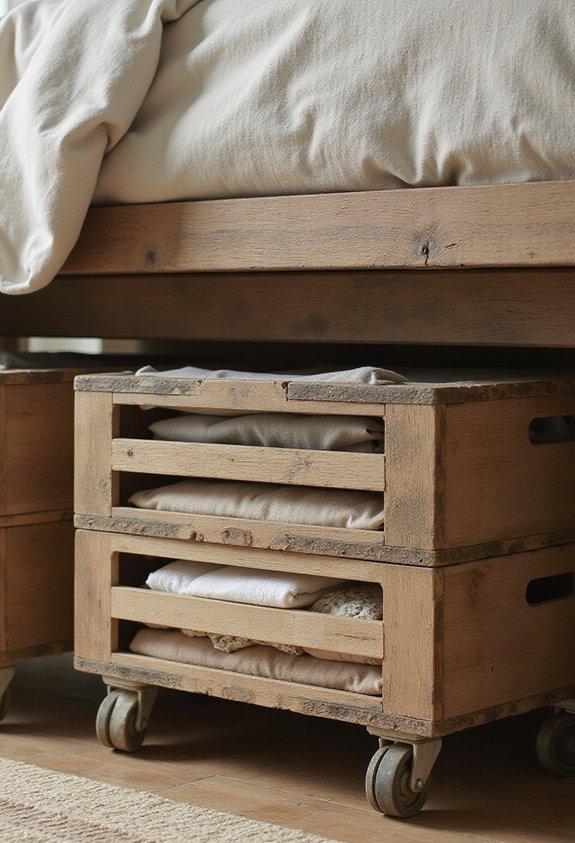
After maximizing your ceiling space, it’s time to tackle underbed storage with wooden crate drawers. You’ll need sturdy wooden crates, wheels, handles, and basic tools to complete this project.
Start by selecting crates that fit comfortably under your bed with minimal clearance. Attach quality wheels to the bottom of each crate so you can easily slide them in and out. Install handles on the front for convenient pulling.
Sand any rough edges and apply a finish that matches your bedroom aesthetic. You can paint, stain, or leave the wood natural. Line the interior with fabric to protect your belongings and add visual appeal.
These customizable drawers provide substantial storage while remaining budget-friendly and accessible. You’ll maximize wasted space while keeping seasonal items, extra bedding, or clothing neatly organized and hidden from view.
Create Personalized Canvas Art From Photos
Transforming cherished photographs into custom canvas art brings personal meaning to your bedroom walls without breaking the bank. You’ll need a quality photo, canvas, adhesive, and a printer or access to printing services.
Start by selecting a high-resolution image that captures a meaningful moment. Upload it to an online canvas printing service or print it yourself at home. If printing independently, use photo paper and quality ink for vibrant results.
Apply a thin, even layer of adhesive to your canvas, then carefully position your printed photo. Smooth out air bubbles using a squeegee or credit card. Once dry, seal the edges and consider adding a protective coating.
The result? A stunning, one-of-a-kind piece that reflects your memories and personality perfectly.
Make Fabric Wall Hangings With Embroidery Hoops
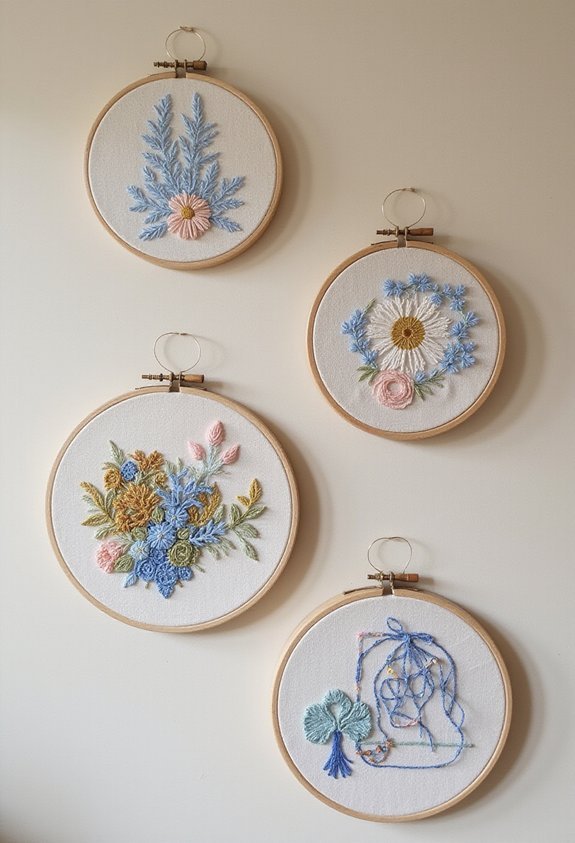
Because embroidery hoops offer a simple frame for fabric art, you can create striking wall hangings that rival gallery pieces. Start by selecting fabric that complements your bedroom’s color scheme—consider patterns, textures, or solid colors that match your aesthetic.
Stretch your chosen fabric tightly across the hoop, securing it firmly. You’ll add embroidery details using colorful threads, creating designs that range from simple geometric patterns to intricate florals. Alternatively, you can paint directly onto the fabric or layer different materials for dimension.
Once you’ve finished your design, trim excess fabric and seal the back with felt or twine for a polished appearance. These personalized hangings cost considerably less than store-bought art while adding genuine character to your space. Display multiple hoops together for maximum visual impact.
Install a Tension Rod Divider for a Cozy Reading Nook
If you’re short on space, a tension rod divider creates an intimate reading area without requiring permanent installation. You’ll need a tension rod, fabric panel, and a corner of your bedroom.
Install the tension rod between two walls or furniture pieces at your desired height. Drape your chosen fabric—curtains, a bedsheet, or tapestry—over the rod. The fabric instantly establishes a visual boundary, separating your reading nook from the rest of your room.
This solution works perfectly for renters since it doesn’t damage walls. You can easily adjust or remove it whenever you’d like. Add a comfortable chair, throw pillow, and small lamp inside your new retreat. The divider muffles ambient noise, creating a peaceful sanctuary perfect for unwinding with your favorite book.
Craft Washi Tape Patterns on Dresser Drawers
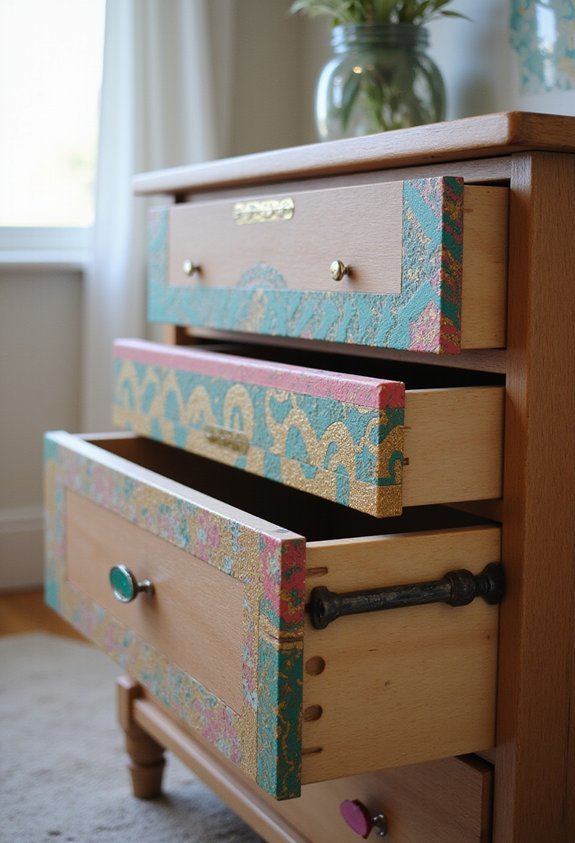
Washi tape offers an easy way to personalize your dresser drawers with bold patterns and colors. You’ll start by cleaning your drawer fronts thoroughly and letting them dry completely. Then, measure and plan your design—whether you’re creating geometric borders, diagonal stripes, or intricate mosaics.
Cut your washi tape to the desired lengths and carefully apply it to each drawer, pressing firmly to eliminate air bubbles. You can layer different tape colors and patterns for added visual interest. The beauty of washi tape is its removability; you can adjust or change your design without damaging the wood.
This project transforms ordinary drawers into statement pieces while keeping your supplies organized and visually appealing. It’s a budget-friendly upgrade that takes just an afternoon to complete.
Create a Wind Chime From Driftwood and Shells
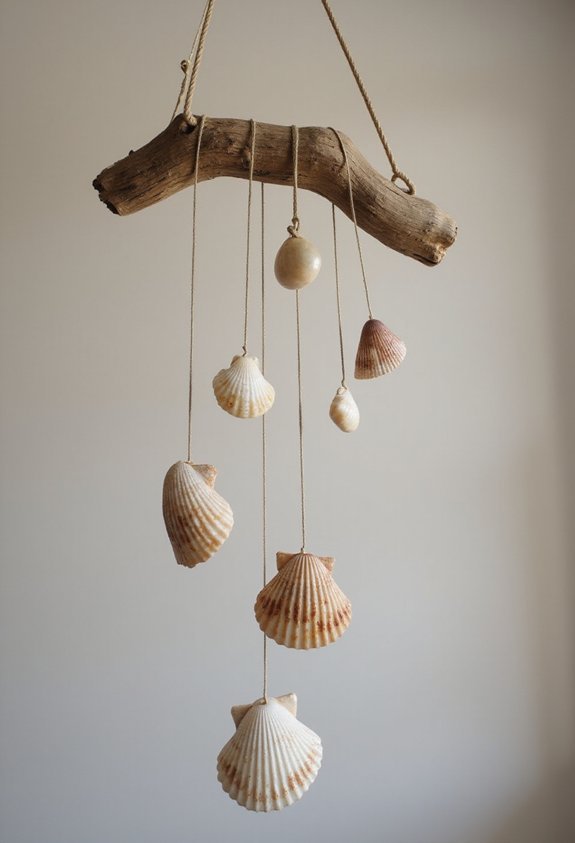
After painting your bed frame, you can add a coastal touch to your bedroom with a handmade wind chime. Gather driftwood pieces, seashells, and fishing line from a beach or craft store. Tie shells to varying lengths of line, creating different heights for visual interest. Attach these strands to a driftwood piece by securing them with knots or small hooks. Hang your wind chime near a window where air currents will gently move it. The shells will create soft, melodic sounds while catching natural light. This project takes about an hour and costs minimal money. Your new wind chime brings ocean-inspired ambiance to your space while serving as a functional decorative piece that’ll complement your freshly painted bed frame perfectly.
Make String Art Designs in Custom Shapes
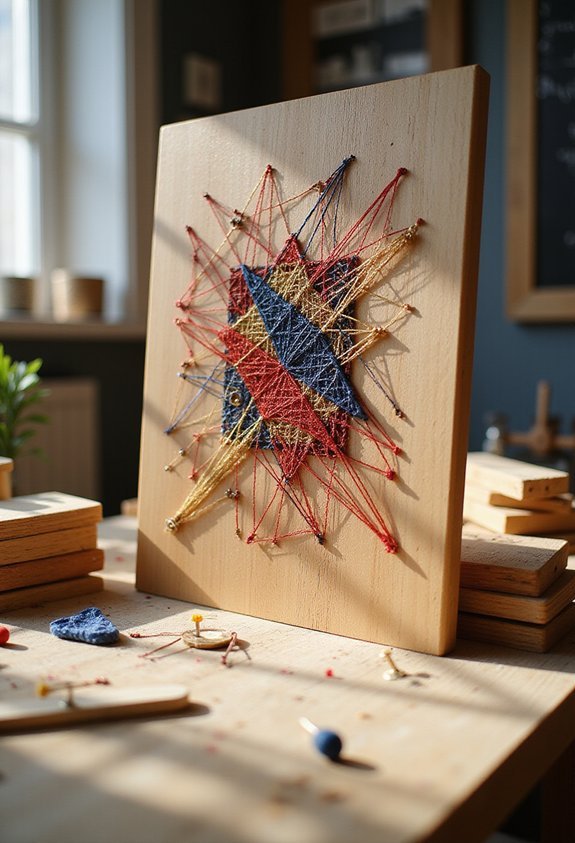
String art lets you create striking geometric patterns and custom shapes that’ll personalize your bedroom walls. You’ll start by sketching your desired design on a wooden board, then hammering nails along the outline. Next, you’ll wrap colorful string or thread around the nails in various patterns to fill in your shape.
Choose designs that match your bedroom aesthetic—hearts, stars, initials, or abstract patterns work beautifully. Select contrasting string colors to make your design pop against the board. You can create a single focal point or arrange multiple pieces for visual interest.
This project requires minimal supplies: a wooden board, nails, a hammer, and string. It’s budget-friendly yet produces impressive results. String art serves as functional décor that reflects your personality while adding dimension to your walls.
Build a Wooden Pallet Accent Wall

Transform one wall into a rustic focal point by building a wooden pallet accent wall that’ll completely elevate your bedroom’s aesthetic. You’ll start by sourcing reclaimed pallets from local businesses or online marketplaces, ensuring they’re clean and safe.
Arrange your pallets horizontally or vertically against your chosen wall, then secure them firmly with construction adhesive and screws. Sand any rough edges for a polished finish.
Next, stain or paint your pallets to match your bedroom’s color scheme—weathered gray, rich walnut, or crisp white all work beautifully. Add a protective sealant if desired. This project transforms your space affordably while creating substantial visual impact. Your bedroom’ll gain instant character and warmth that’ll impress anyone who enters.
Design a Bookshelf Styling Display With Floating Shelves
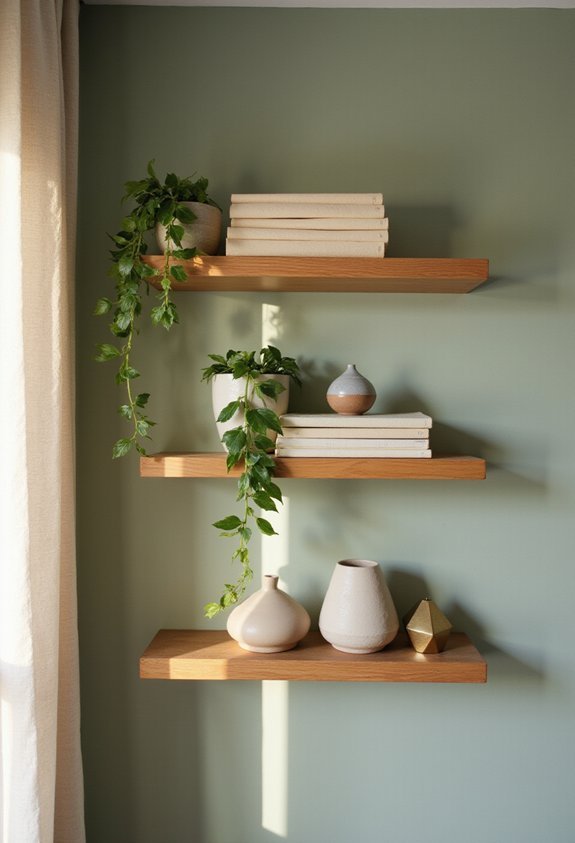
Floating shelves offer an elegant way to display your book collection while maximizing vertical space in your bedroom. You’ll create visual interest by arranging books both vertically and horizontally, then interspersing decorative items like framed photos, small plants, or candles between them.
Install shelves at varying heights to establish dynamic spacing and prevent a monotonous appearance. Choose a color scheme that complements your room’s palette—natural wood tones, black metal brackets, or white shelves all work beautifully depending on your style.
When styling, group books by color or size for cohesion. Leave some breathing room; overstuffed shelves feel cluttered. Consider adding a decorative bookend or two to anchor sections.
This project requires basic tools and wall anchors, making it entirely achievable for beginners.
Create Layered Rugs to Define Your Sleep Zone
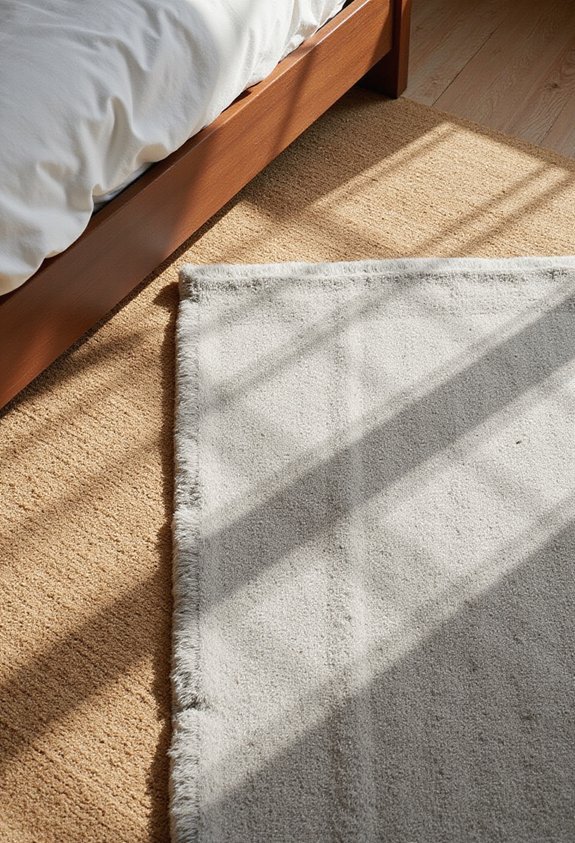
By strategically layering rugs, you’ll anchor your bed and create a defined sleeping zone that feels intentional and inviting. Start with a large neutral base rug that extends under your bed frame, then layer a smaller, textured rug on top for visual interest and comfort.
Choose complementary colors and patterns that reflect your style—consider mixing geometric designs with solid textures. This approach defines your sleep area without requiring permanent changes.
Layered rugs also solve practical problems. They add warmth underfoot, reduce noise, and protect your flooring. You can easily swap pieces seasonally or when you want a fresh look.
The key is ensuring each rug complements your existing furniture and the room’s color palette. This simple technique transforms your bedroom into a cohesive, organized space.
Make a Rope-Wrapped Mirror Frame

When you’re ready to add warmth and texture to your bedroom walls, a rope-wrapped mirror frame offers an easy, budget-friendly solution. Start by gathering a basic mirror, jute rope, and hot glue or adhesive.
You’ll measure your mirror’s perimeter and cut the rope accordingly. Apply adhesive to the mirror’s edge frame, then carefully wrap the rope around it, pressing firmly as you go. Work in small sections to guarantee the rope adheres smoothly without gaps or bunching.
Once complete, you’ve created a coastal-inspired focal point that complements any bedroom style. Hang your finished mirror above a dresser or nightstand to instantly elevate your space with minimal effort and expense.
Paint Mason Jars as Decorative Desk Organizers
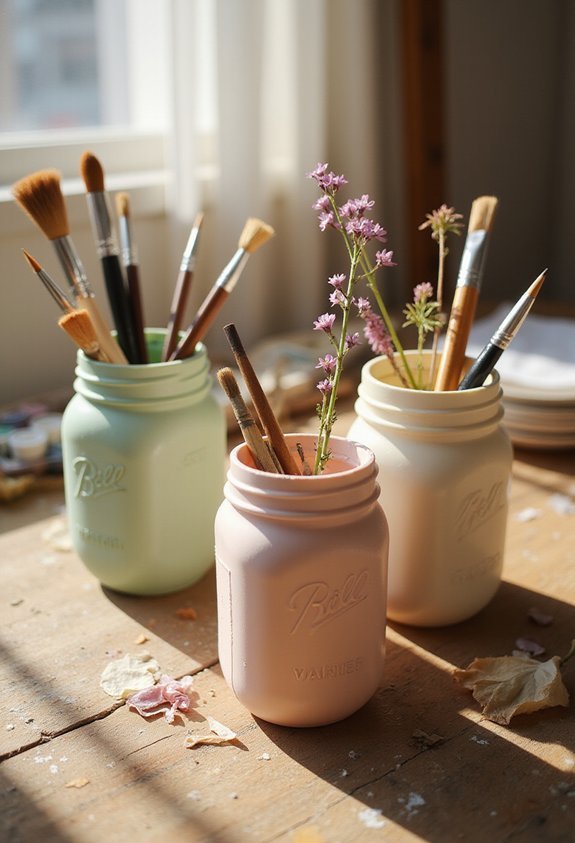
After creating textured wall decor, you’ll want to tackle functional storage that looks just as stylish. Mason jars make perfect desk organizers when you paint them in coordinating bedroom colors.
Start by cleaning the jars thoroughly, then apply primer to guarantee even paint coverage. Use acrylic paint in your chosen hues, applying two coats for opacity. You can paint solid colors, create ombré effects, or add patterns with tape or stencils. Once dry, fill your jars with pens, pencils, makeup brushes, or small supplies.
Group them by size and color on your desk for visual impact. This affordable project transforms basic containers into personalized organizers that enhance your bedroom’s aesthetic while keeping essentials within reach.
Build a Simple Wooden Frame Bed Bench
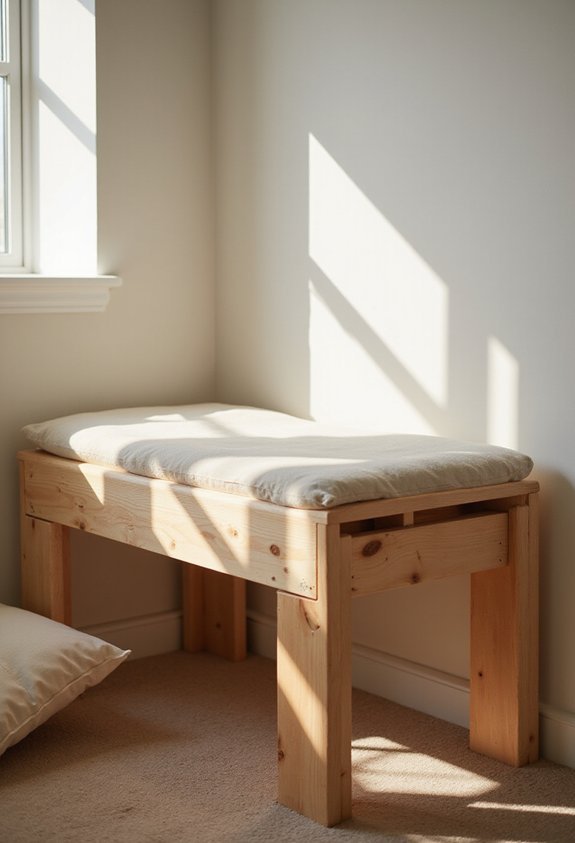
Now that you’ve organized your desk with painted mason jars, you can channel that same creative energy into building a bed bench—a functional piece that adds both storage and style to your bedroom. You’ll need basic materials: two-by-fours, plywood, screws, and wood stain or paint.
Start by constructing a sturdy rectangular frame using the two-by-fours, then attach plywood to create the seat surface. Add hinges underneath to create hidden storage space for extra bedding or pillows.
Sand all surfaces smooth and apply your chosen finish for a polished look. Position your bench at the foot of your bed as an attractive focal point. This project takes just a few hours and requires only fundamental carpentry skills, making it perfect for weekend warriors.
Create Custom Pillowcases With Iron-On Transfers
With your bed bench complete, it’s time to personalize your pillowcases with custom designs using iron-on transfers. You’ll need pillowcases, transfer paper, an iron, and your chosen designs printed on the transfer sheets.
First, preheat your iron to the manufacturer’s recommended temperature. Position your design face-down on the pillowcase, then press the iron firmly over the entire transfer for 30-60 seconds. Apply consistent, even pressure to guarantee proper adhesion.
Allow the transfer to cool completely before peeling away the backing paper. For durability, wash your pillowcases inside-out in cool water and avoid bleach.
This project lets you display photos, quotes, or artwork on your bedding. You can create matching sets for family members or refresh your pillowcases seasonally with minimal investment.
Design a Vision Board Wall for Motivation
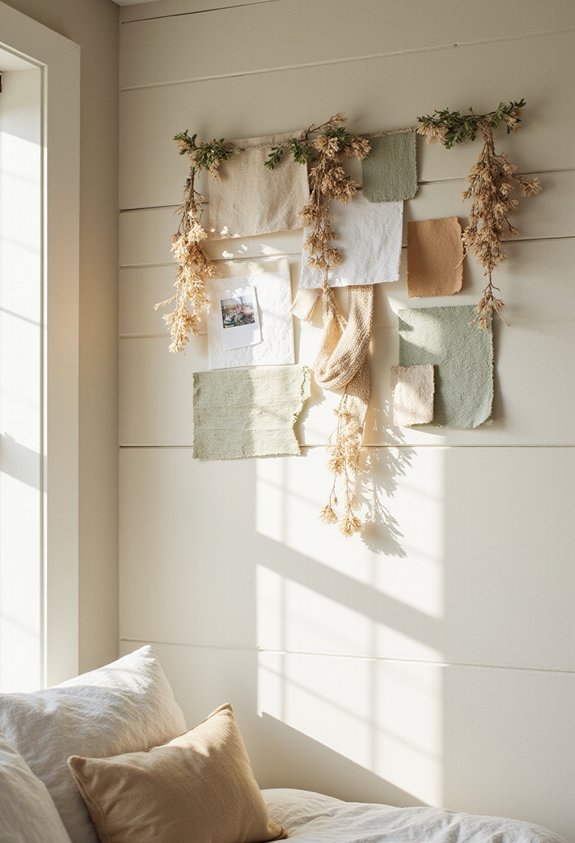
Your bedroom walls can become a powerful tool for inspiration and goal-setting when you transform them into a personalized vision board. Gather images, quotes, and words that resonate with your aspirations and values. Cut them from magazines, print them from the internet, or use photos you’ve taken.
Arrange these elements on a large poster board or directly on your wall using removable adhesive or painter’s tape. Consider organizing them by category—career, relationships, health, travel—for clarity.
Add drawings, sketches, or handwritten affirmations to make it uniquely yours. Arrange elements thoughtfully rather than randomly placing them. This visual representation of your goals keeps you motivated daily, reminding you of what matters most and encouraging you to take action toward achieving your dreams.
Make Over Your Dresser With Contact Paper Drawer Liners
While your vision board inspires your goals from the wall, the space inside your dresser deserves equal attention. You’ll transform plain drawers into organized, visually appealing storage with contact paper drawer liners.
Start by measuring your drawer dimensions, then cut your chosen contact paper to fit. Smooth it carefully into each drawer, working out air bubbles as you go. Select patterns or colors that complement your bedroom aesthetic—geometric designs, pastels, or metallics all work beautifully.
Contact paper liners protect your drawers from dust and spills while making cleanup effortless. They also prevent items from shifting during daily use. The best part? You’ll refresh your drawer interiors without spending much money or time. This simple project instantly elevates your dresser’s functionality and style, making everyday storage feel intentional and curated.
How long do most DIY bedroom decor projects actually take?
It varies quite a bit depending on the project.
Simple things like creating a gallery wall, hanging string lights, or making a throw pillow cover can be done in under two hours. Projects involving paint, fabric adhesive, or wood construction typically need a full day including drying and setting time.
The projects in this article that claim to be doable in a weekend genuinely are, as long as you read through the full instructions before starting and have all your supplies ready to go rather than making mid-project supply runs.
What basic supplies should I have on hand for DIY bedroom decor?
A hot glue gun, a good pair of scissors, measuring tape, a level, and a hammer with picture hooks cover the basics for most projects on this list.
For painting projects, add a small foam roller, painter’s tape, and a drop cloth to that list.
For wood projects, a drill and basic drill bits are worth having. Beyond those essentials, each project has its own specific supply list that you can gather before you start.
How do I make DIY bedroom decor look polished rather than homemade?
Take your time with the preparation steps rather than rushing to the visible work.
Proper measuring, clean cuts, level hanging, and neat edges are what separate a professional-looking result from one that looks rushed. Most DIY projects that end up looking messy do so because the prep steps were skipped or hurried.
Sticking to a consistent color palette across everything you make in the same room also makes individual pieces look more intentional and cohesive together.
Which DIY bedroom projects give the best results for the least effort?
Gallery walls, string light canopies, and fabric headboards consistently give the most dramatic visual results relative to the time and skill they require.
All three transform the main focal areas of a bedroom, which are the walls and the area around the bed, without requiring advanced skills or significant cost.
If you are new to DIY projects, starting with one of those three will give you a confidence-building result that motivates you to keep going.
How do I choose a DIY project that suits my skill level?
Be honest with yourself about what you have successfully completed before rather than what you think you could probably manage.
Projects involving cutting straight lines, measuring accurately, and following multi-step instructions are all learnable but they do take practice. If you are completely new to DIY, start with something that requires no tools at all, like arranging a gallery wall or creating a fabric wall hanging with an embroidery hoop.
Build up from there and your confidence and results will improve quickly with each project you complete.
Conclusion
Fifty ideas is genuinely a lot, and the worst thing you can do with a list this long is feel overwhelmed by it and do nothing.
Pick one project this weekend. Just one.
Something that addresses the part of your bedroom that has been bothering you, that uses supplies you can get easily, and that you can realistically finish in the time you have available.
Completing one project well does more for your bedroom and your motivation than starting several and abandoning them halfway through.
I started my DIY bedroom transformation with a simple gallery wall a few years ago and it completely changed how I felt about the whole room. One afternoon, a few frames from a thrift store, and some printed photos. That was it.
Sometimes the simplest starting point leads to the biggest shift in how a space feels.
If you complete any of the projects from this list, I would love to see what you made. Drop a comment below and tell me which one you went with!

